RichN I noticed in one of your pictures you have some speakers I'm wondering if you did not cut the wires from the radio out or did you run the radio separate from the harness because I was thinking when I get to that stage my plan was to leave the stock radio wires alone and also the wires going to the cigarette lighter plug use it to connect one of those usb adapters to be able to charge my phone and also I'm following all your steps to get it road legal because here in NJ the standards are looking the same as yours
RichN City Goblin - 2007 LT donor
- Thread starter RichN
- Start date
RichN
Well-Known Member
The only wire I kept from the radio from the donor harness was the red power wire from the BCM.RichN I noticed in one of your pictures you have some speakers I'm wondering if you did not cut the wires from the radio out or did you run the radio separate from the harness
The radio is a motorcycle one from eBay that includes speakers.
You can't see it from this picture, but I kept both cigarette lighter/ power plugs on the shifter.
The defroster is plugged into the one that is behind it.
The upper one in front of the cup holder has a usb adapter plugged in.
RichN
Well-Known Member
Great news.
Last item for my re-inspection Wednesday is done.
I figured out the spot brakes for less than $10.
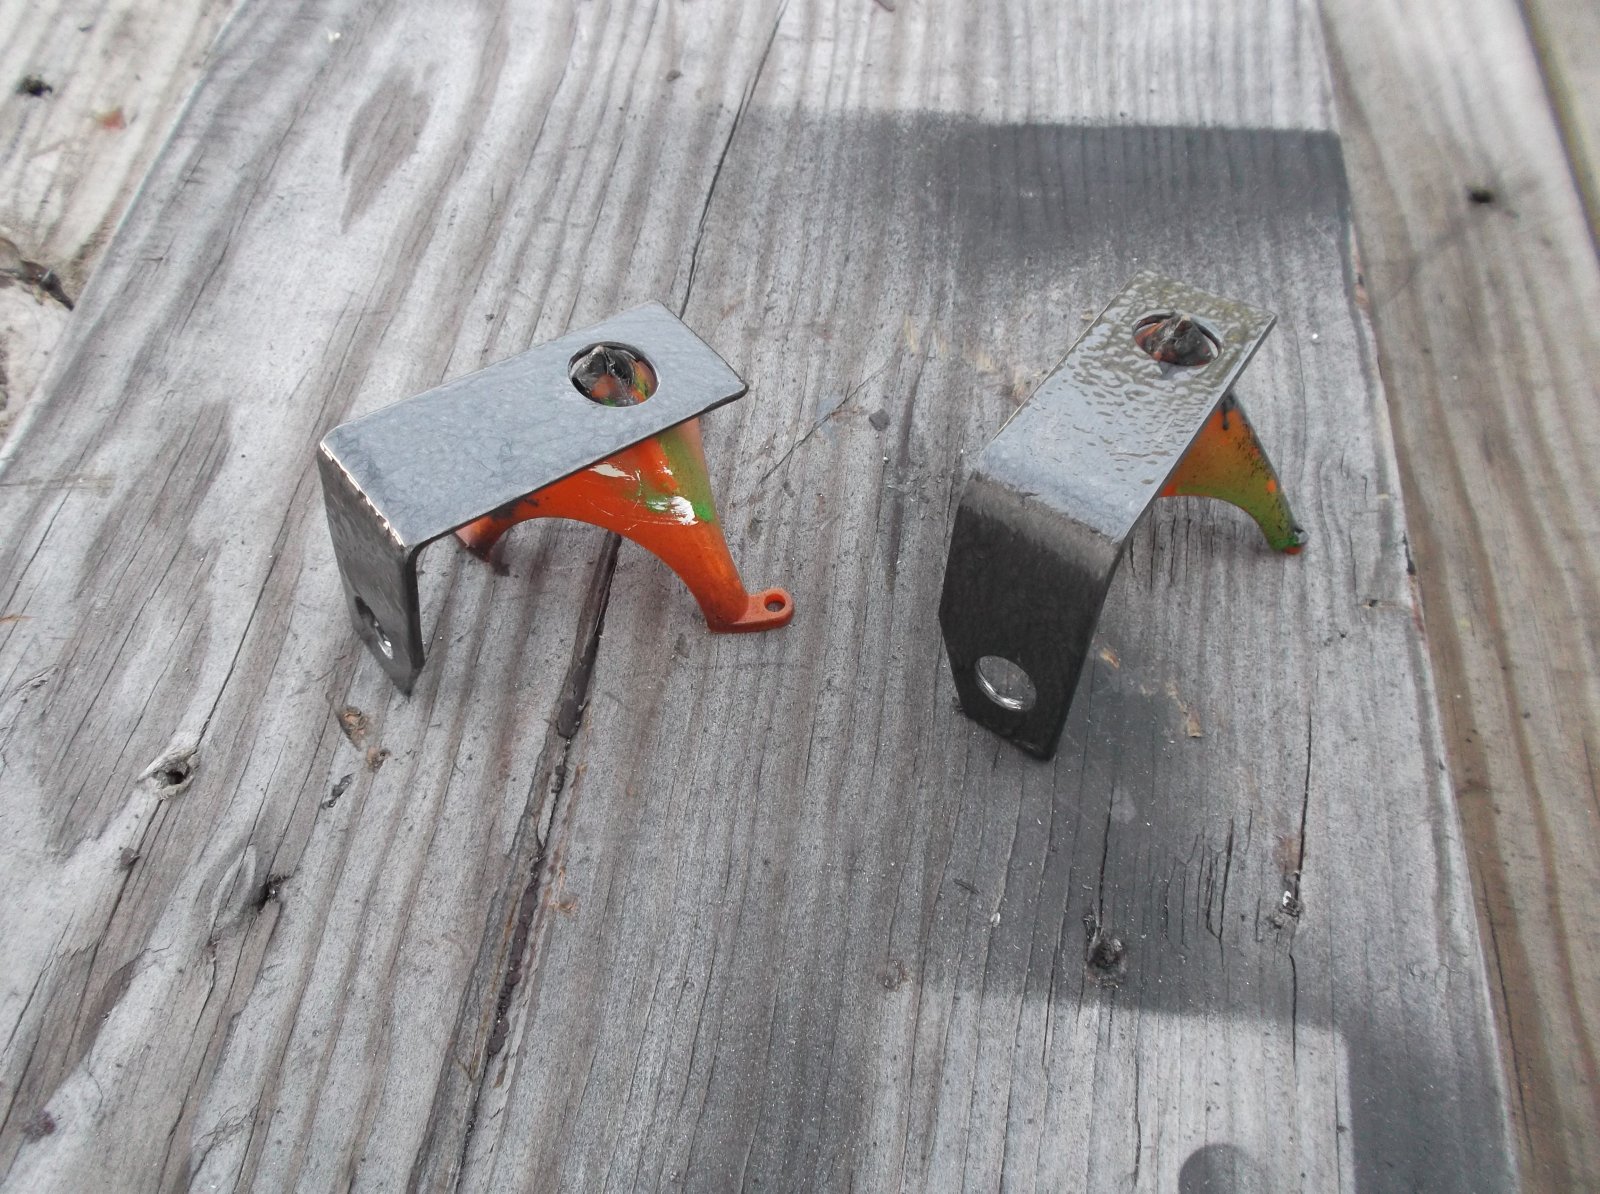
I got some 12ga 1" flat steel 36" long from Home Depot for $5 that I fashioned into brackets and $4 for #50 chain links from Tractor Supply.
The brackets I made by bending to a 90 by hammering the flat steel in a bench vice.
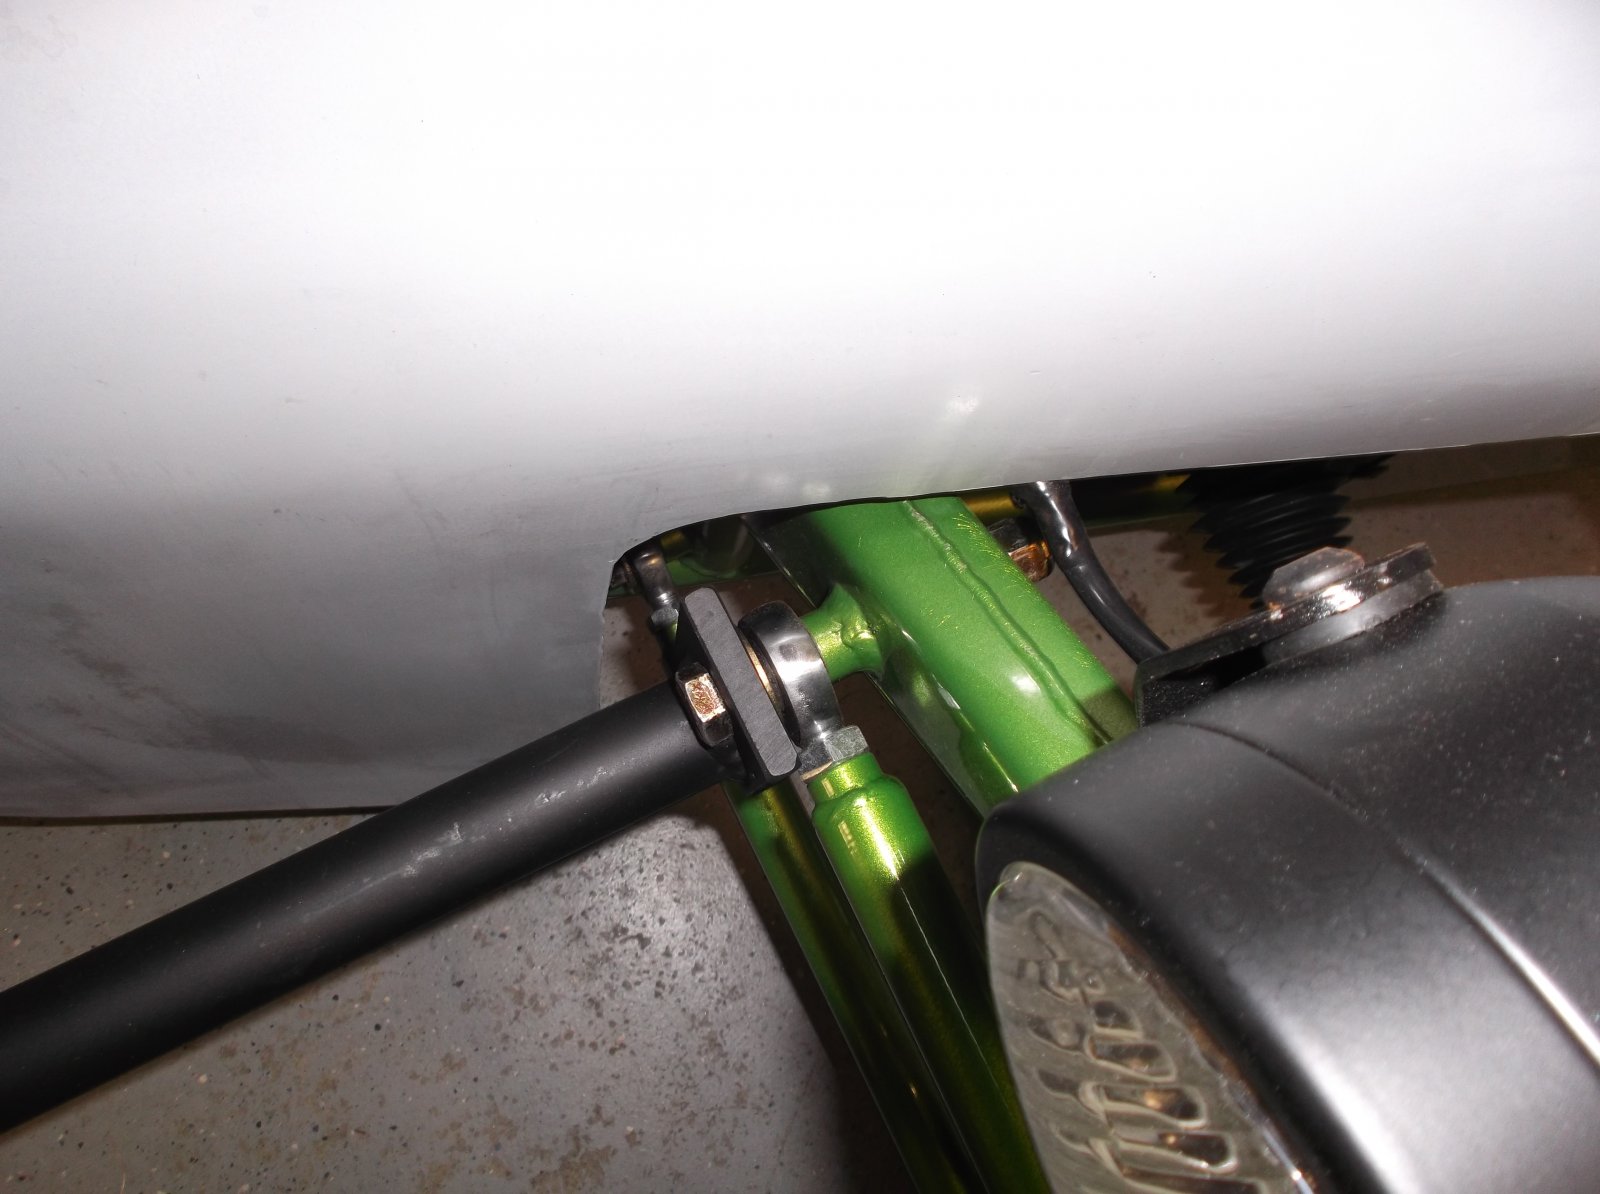
One length is 2" long with a hole for the lower ball joint bolt and an angle cut out to fit the steering knuckle.
The other length is 2 1/2" with a hole drilled for the donor parking brake cable.
I drilled the holes with a stepper bit.
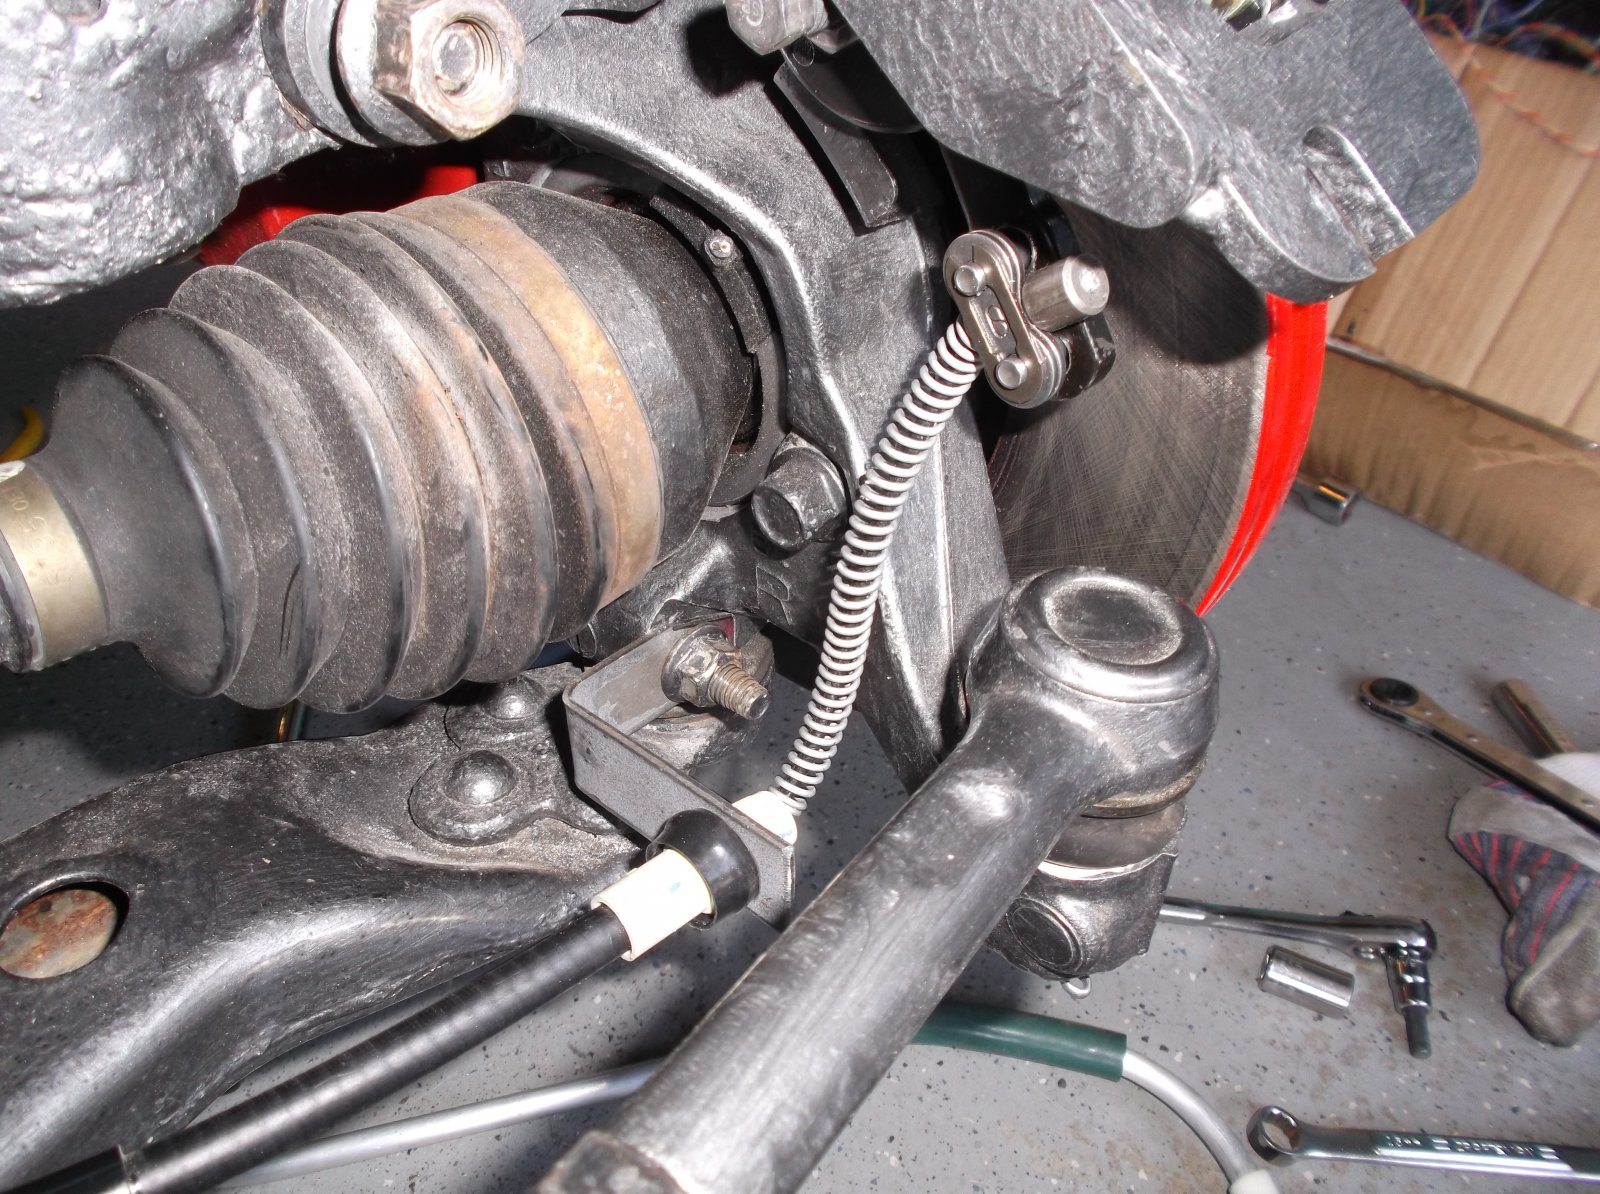
The cable was attached to the Wilwood spot using No. 50 connecting links for roller chains. Tractor Supply SKU#1151066
The link kit contains 4 sets so I used 2 of the flat pieces under the locking slide.
Took them off to paint. Things tend to rust up here if they're not protected.
Last item for my re-inspection Wednesday is done.
I figured out the spot brakes for less than $10.
I got some 12ga 1" flat steel 36" long from Home Depot for $5 that I fashioned into brackets and $4 for #50 chain links from Tractor Supply.
The brackets I made by bending to a 90 by hammering the flat steel in a bench vice.
One length is 2" long with a hole for the lower ball joint bolt and an angle cut out to fit the steering knuckle.
The other length is 2 1/2" with a hole drilled for the donor parking brake cable.
I drilled the holes with a stepper bit.
The cable was attached to the Wilwood spot using No. 50 connecting links for roller chains. Tractor Supply SKU#1151066
The link kit contains 4 sets so I used 2 of the flat pieces under the locking slide.
Took them off to paint. Things tend to rust up here if they're not protected.
Last edited:
RichN
Well-Known Member
Grasshopper asked me for some pictures =
Looking for pictures on how it mounts to the frame and also different angles of the bumper mounted. Also have any unmounted? I saw the rear bumper and saved that picture. Thanks! And happy Friday!
I don't have any unmounted at this time. I will post some before I ship them back to Texas.
If I was keeping this, you need to buy a longer bolt. I'm assuming when Lonnie has the option for a front bumper, longer bolts will be included.
I plan on no front and using Bruce's idea of a Rav4 or Kia brush guard.
BAR-AIR
Well-Known Member
Thank you for posting your solution to the mounting of the emergency brakes. In the stock form the supplied brackets will not work... the bracket to which the emergency brake cable casing attaches to will actually release the brake instead of engaging it. The cable needs to pull the spot brake lever downward not up as the bracket orientation is set up.....
One step forward half a step back.......
Karter2026
Goblin Guru
Rich,
In the picture with the chain link on the caliper. Check that lower strut mount nut it looks to only be on by a thread or two.
In the picture with the chain link on the caliper. Check that lower strut mount nut it looks to only be on by a thread or two.
RichN
Well-Known Member
Thanks. The bracket is only on temporary, I didn't tighten those mocking it up and also because it is easier to put the links on with the caliper un-mounted.Rich,
In the picture with the chain link on the caliper. Check that lower strut mount nut it looks to only be on by a thread or two.
The spot brake handle can be flipped to change the "on-off" directions:View attachment 1857 Rich,
Thank you for posting your solution to the mounting of the emergency brakes. In the stock form the supplied brackets will not work... the bracket to which the emergency brake cable casing attaches to will actually release the brake instead of engaging it. The cable needs to pull the spot brake lever downward not up as the bracket orientation is set up.....
One step forward half a step back.......
Here's the spot brake in the out of the box configuration. As the arm moves away from the mount holes at the top, the brake is applied.
Remove the threaded piece with the jam nut on it. Then inside of the caliper, tap the pivot pin out:
Move the arm off of the pin, flip it over and slide it back on the pin so that the ramps on the arm are facing up:
Tap the pivot pin back in and reassemble the caliper. Now when you pull the arm up toward the mount holes the brake will be applied.
RichN
Well-Known Member
Registration update:
Soooo close. I went again yesterday. The parking brake was not adjusted properly. It held, but not under light throttle. Now he wants to see the evap canister installed. That wasn't on the list he gave me last time. The inspector called a supervisor, he made some calls to the DMV Title dept supervisor, and he took some more pictures for the Director of DMV. I was there 2 1/2 hrs today.
For some unknown reason, they are going to do things differently for me.
They did give me a VIN = YEAH! Now I can scrap the donor.
I was told not to apply for plates until after I pass an emissions and safety inspection (normal windshield sticker).
That is weird because an inspection station wants your registration to do the inspection.
I went to the town clerk and paid for a title. That should arrive in the mail in about 4 weeks.
I can register the car at town hall anytime, even if I do not have the title, just bring back my copy of the title application.
Now I need to trailer it somewhere for another inspection after I adjust the brakes and install the canister.
Anyone have a suggestion for a small and cheap one? Mine is gone and there looks like there is enough room above the fuel tank. I'm not sure where my purge valve went. I can get another one and hook it up. Where will all the hoses go? I think one end will go back to the tank, I can put a tee in the overflow vent tube.
RichN
Well-Known Member
Luckily, I found my canister digging through the donor. The trunk is full and the interior is filled to the roof with scrap metal and car parts from other vehicles.
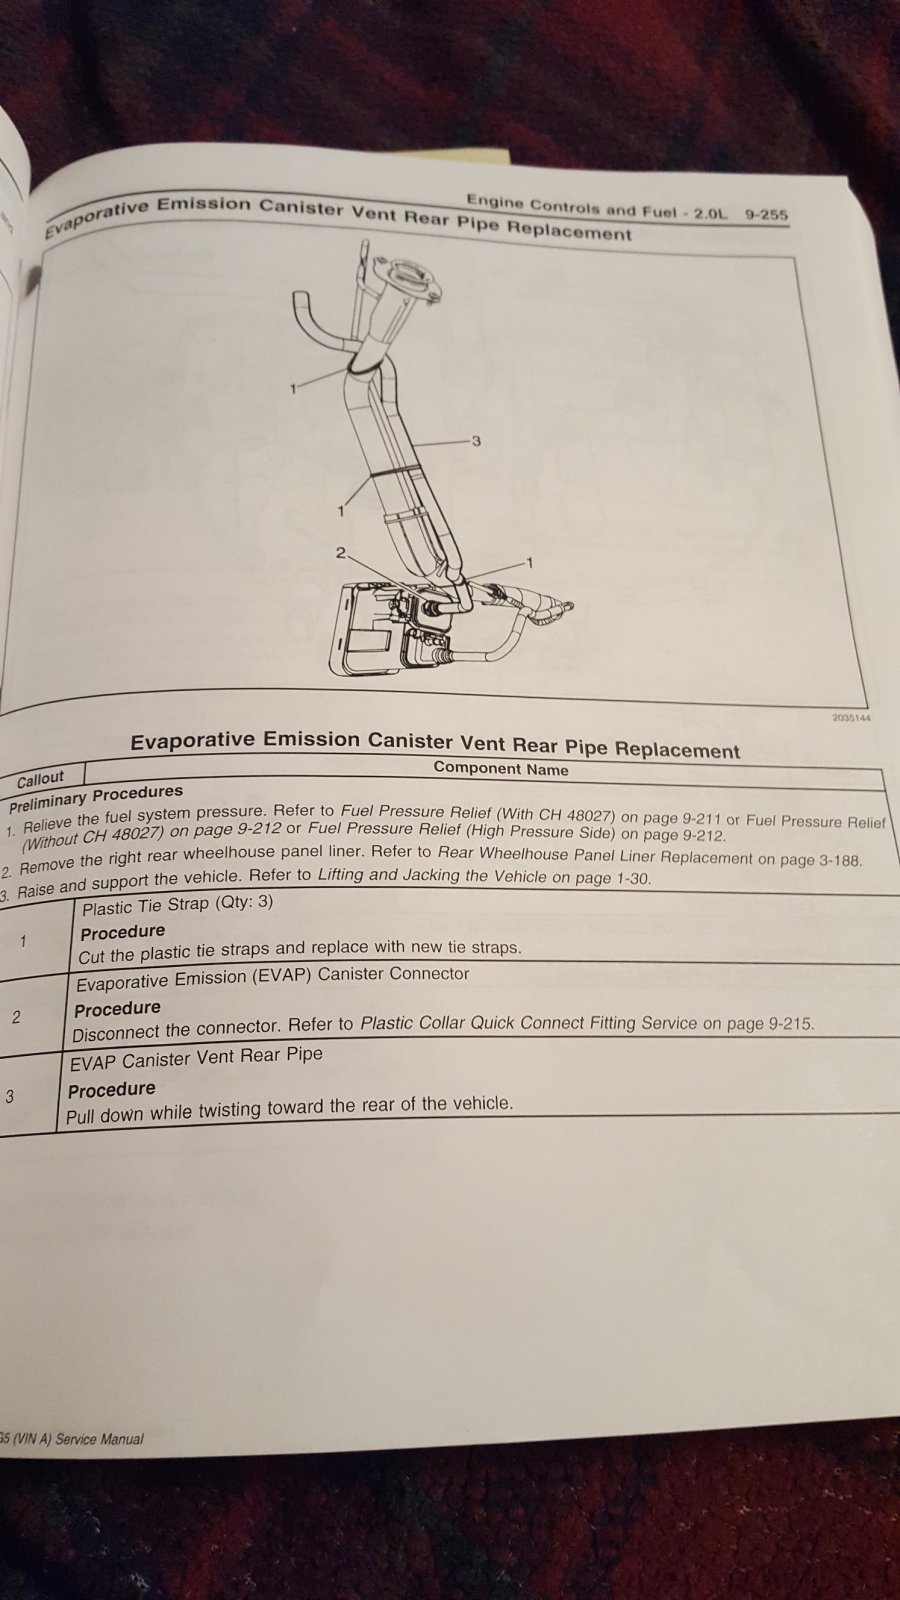
When I Googled some diagrams for how to route everything, I couldn't find a good one. Can anyone help me out?
Thanks
When I Googled some diagrams for how to route everything, I couldn't find a good one. Can anyone help me out?
Thanks
I hope someone can find one because I'm looking for one just so I can keep in my records since I'm guessing I'm going to have to install that also here in jersey to pass inspection but no luck on a diagram
And also since I'm not up to the stage on the wiring harness did you cut out all the wires to evap system and would anyone know if a Cali car is different in that part
And also since I'm not up to the stage on the wiring harness did you cut out all the wires to evap system and would anyone know if a Cali car is different in that part
RichN
Well-Known Member
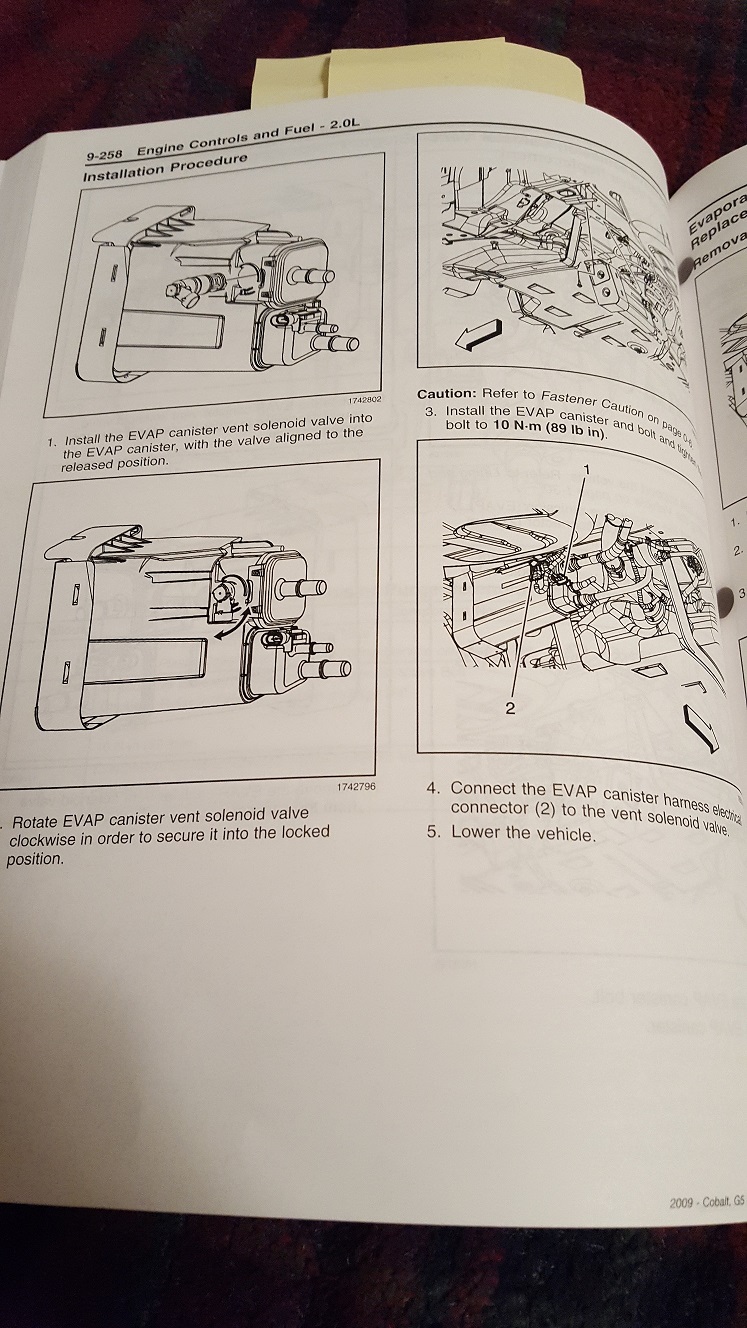
Thanks Jaret,does this help? I have access to all the 2005 stuff, but I think its a little different for your car. General principal is the same though.
I think they are all the same NA/SC/TC.
The picture helps, but like the others I Google, it doesn't show where to hook up the tubes.
I'm guessing the one from the purge valve goes to the intake, but which port on the canister?
The middle hose goes to the tank, I can put a T.
Where does the bottom one go?
Hopefully, someone who hasn't dropped their tank on the donor yet can give me a hand.
Briann1177
Goblin Guru
One should go to your fuel filler neck which then vents to the open air. If you can make heads or tails out of the pics...

Last edited:
So I have a question how are you going to put FTP sensor on the new gas tank and also the grade vent valve I tired to take it out of the old gas tank put I did not know how did you take them out or are you buying new sensor and grade vent valve
That's a picture of my gas tank I'm talking about the 2 Round grommets left and right of the fuel pump
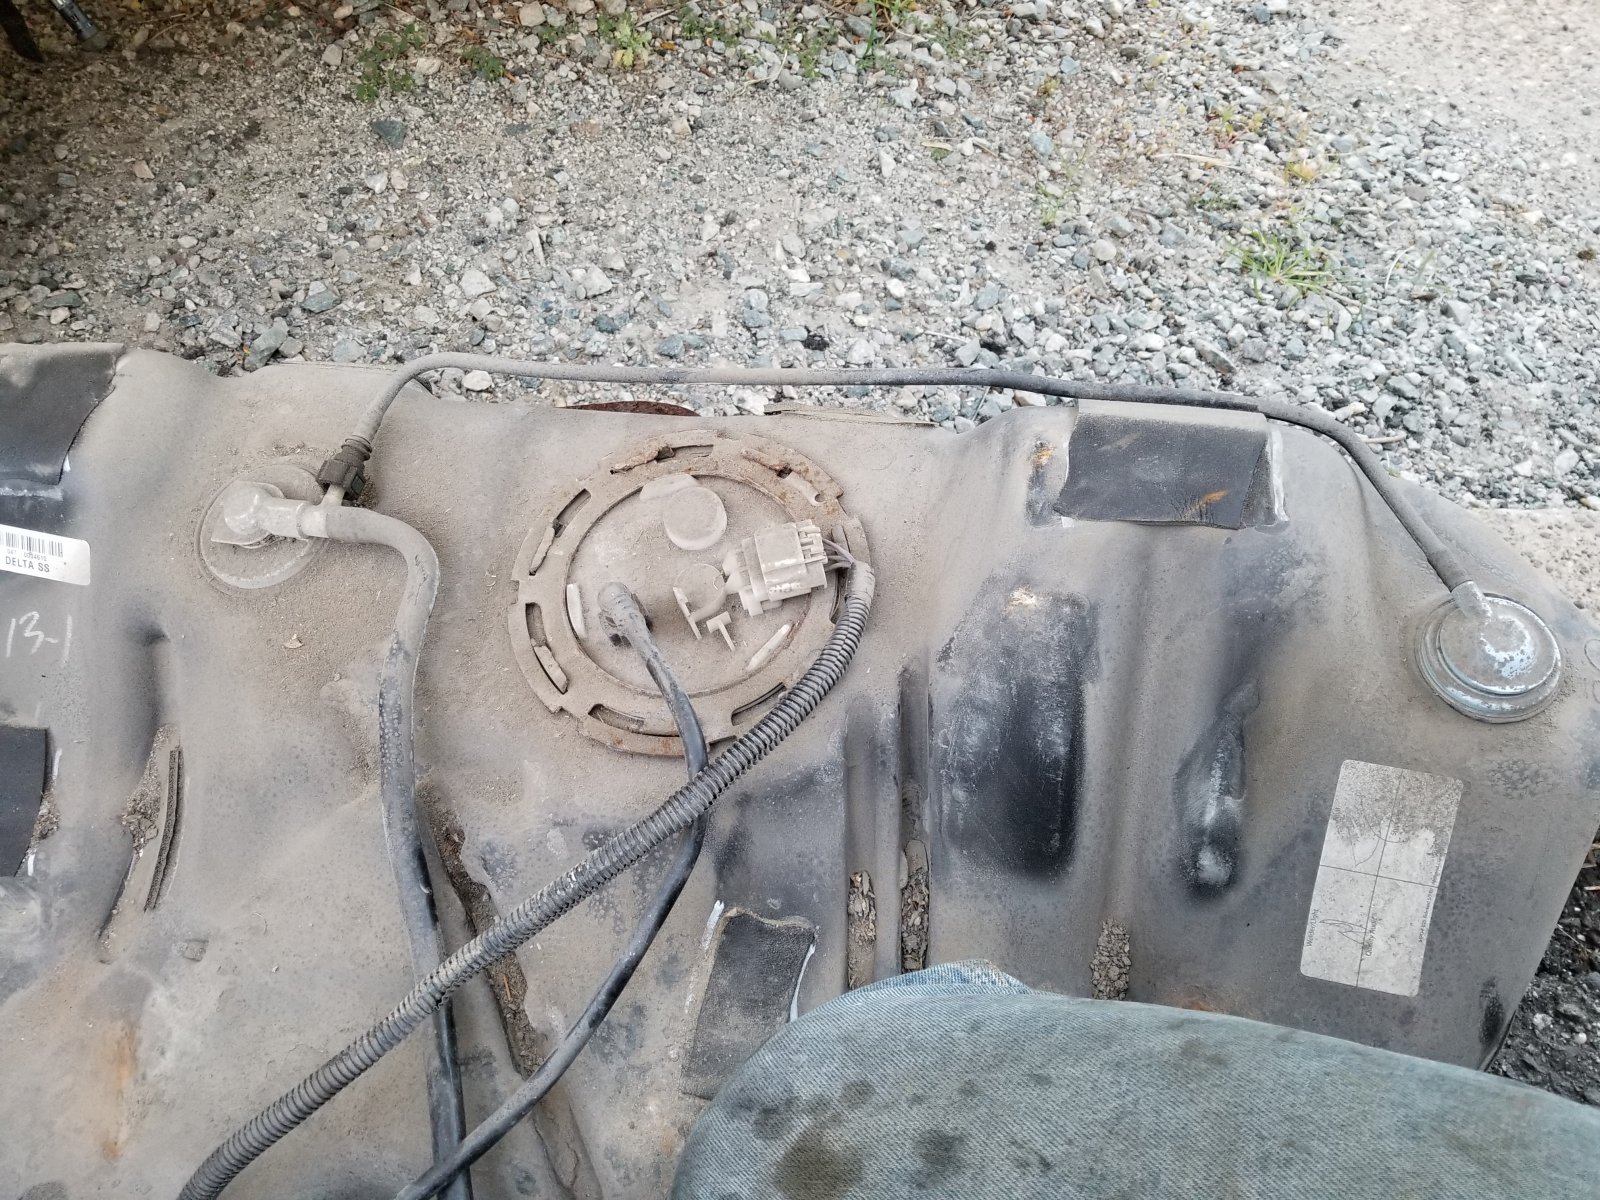
That's a picture of my gas tank I'm talking about the 2 Round grommets left and right of the fuel pump
RichN
Well-Known Member
First off...
")
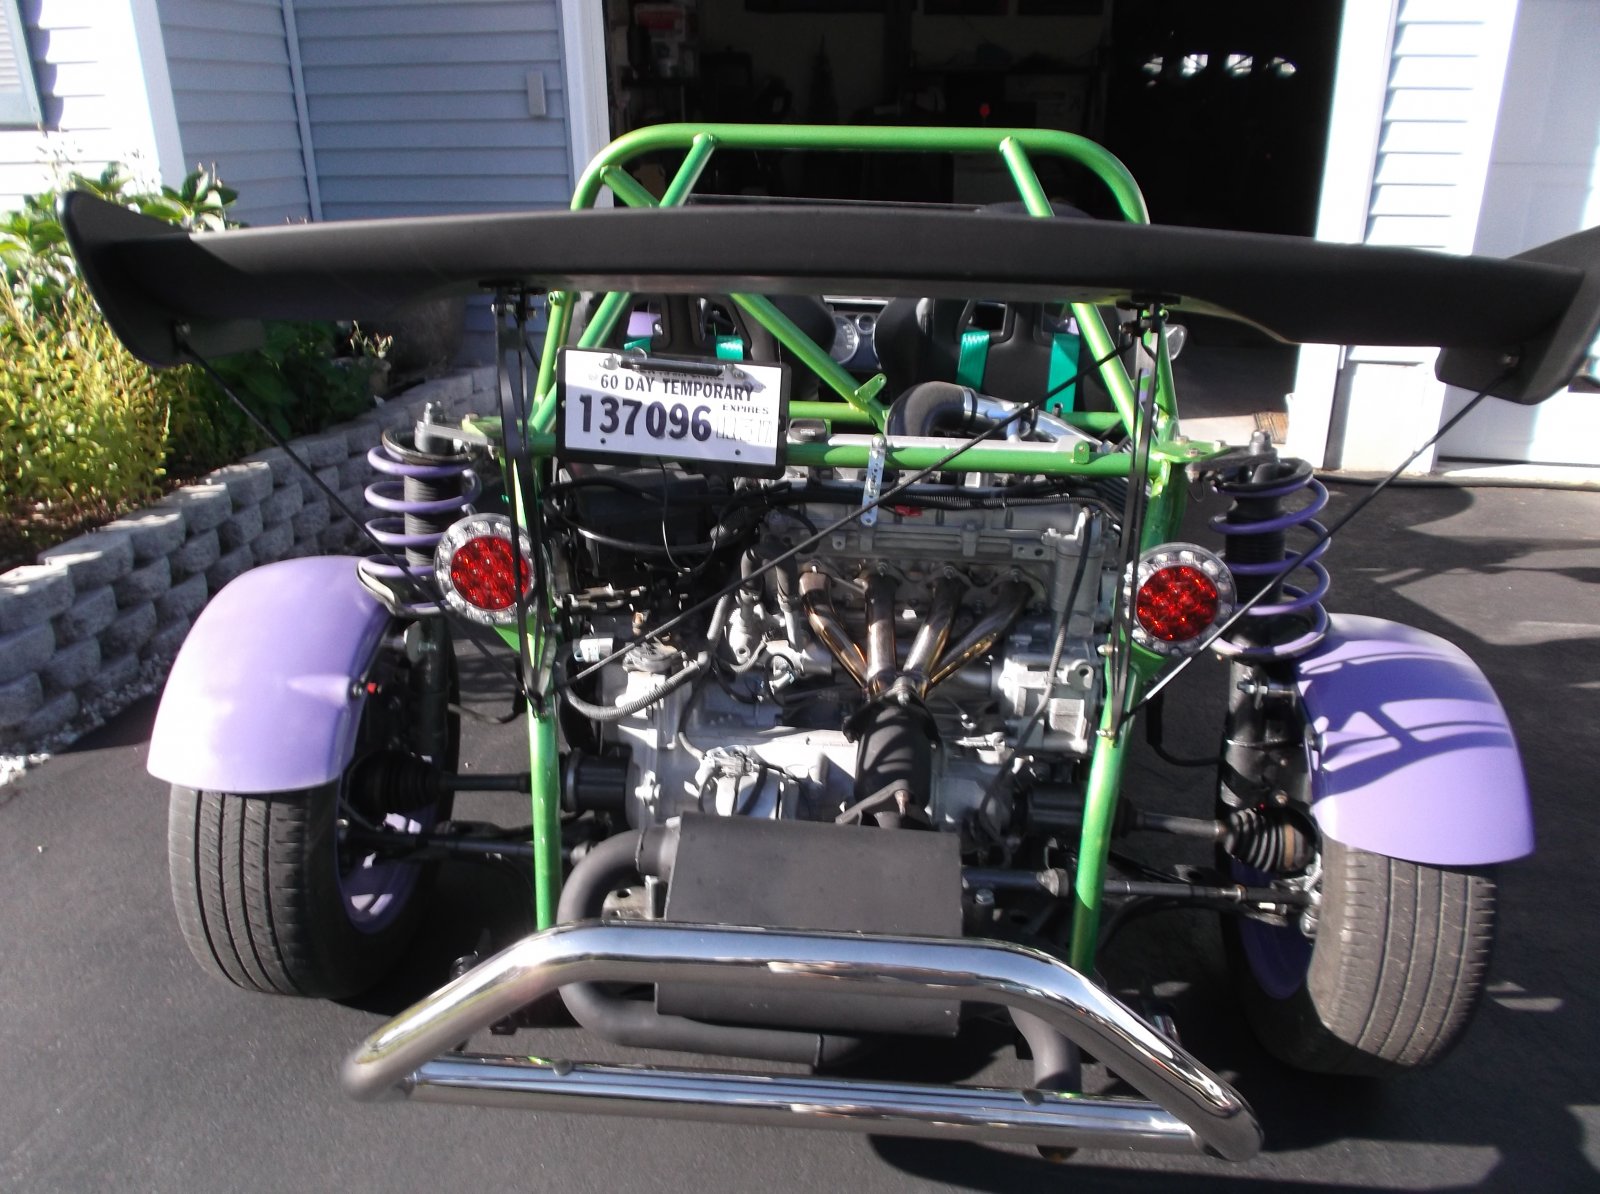
Now that I have plates, I can drive around town legally.
This one is only temporary, Veteran plate GOBLIN will arrive in the mail next month.
The engine cover is off again while I work on the evap. system.
I'll finish up emissions before my inspection that's scheduled next Wednesday.
Side shot of the new rear bumper.
I bought a push bar for Honda Pilot, in case I didn't like it, I could install it on the wife's car.
It looks weird at first, but it is starting to grow on me and totally meets the height requirements.
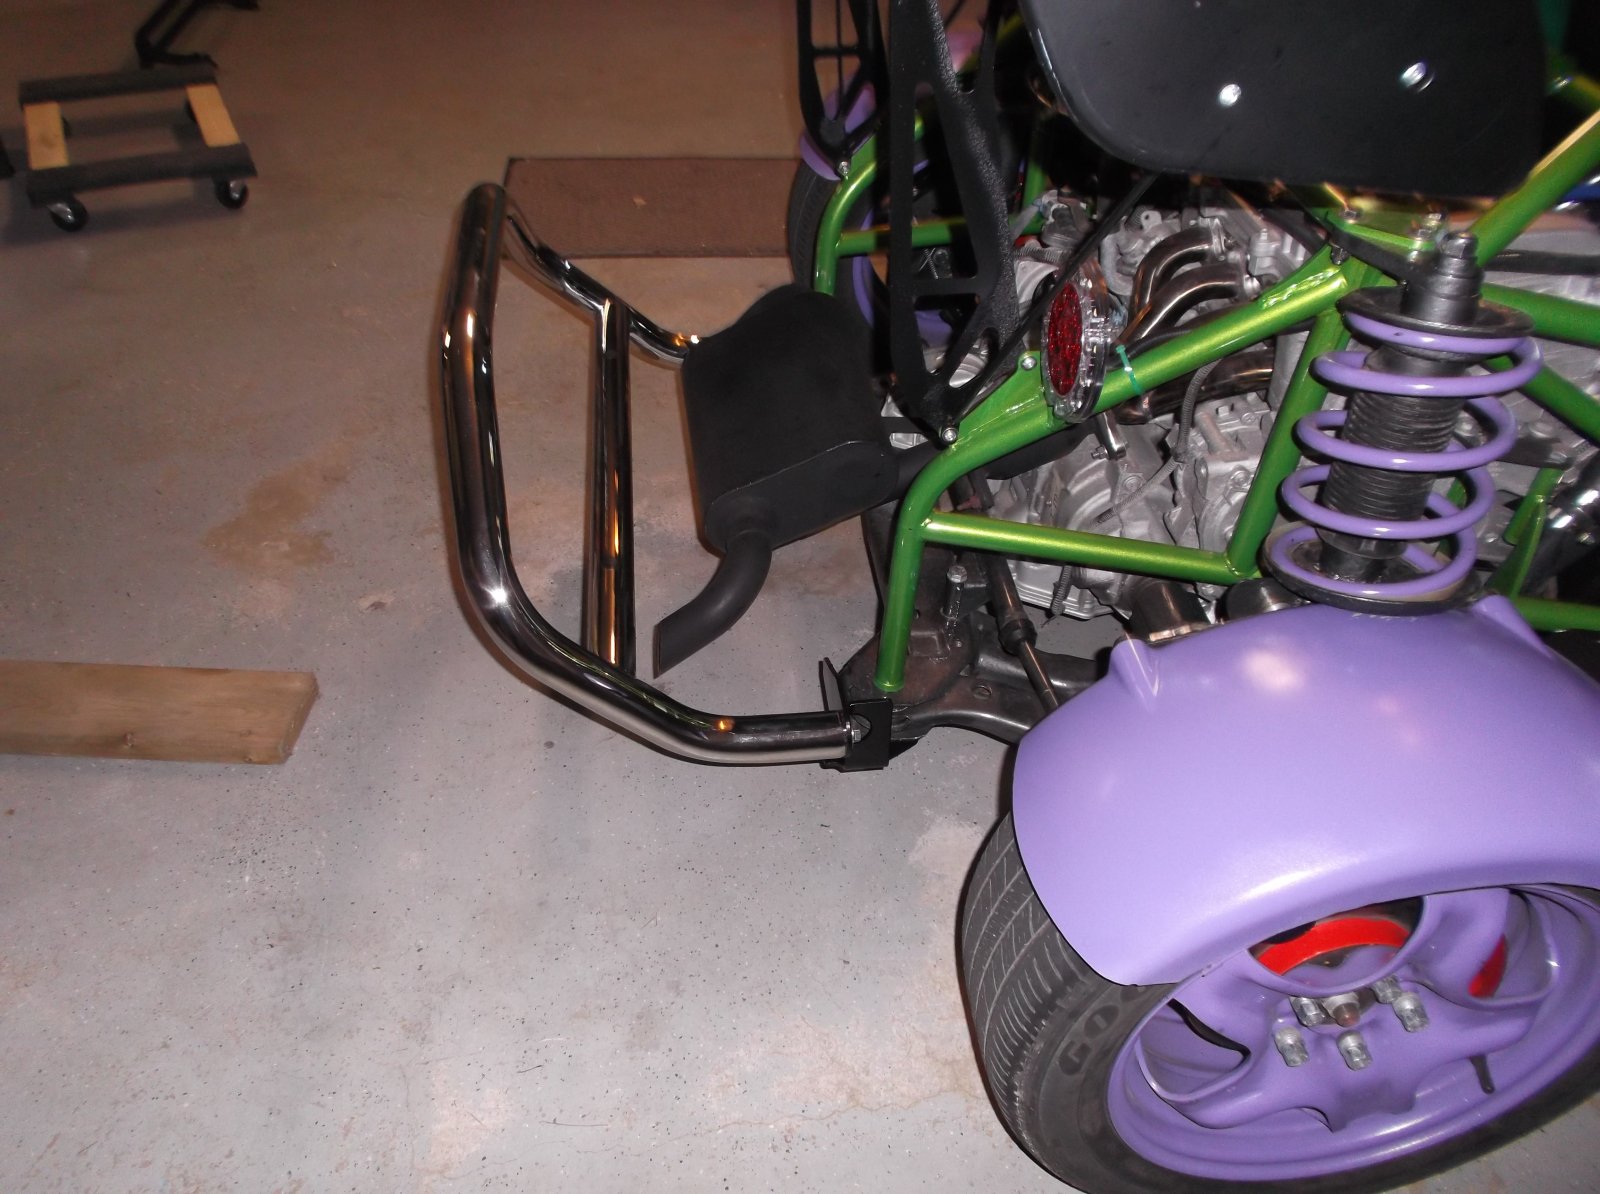
Photo of the first rear bumper

Now that I have plates, I can drive around town legally.
This one is only temporary, Veteran plate GOBLIN will arrive in the mail next month.
The engine cover is off again while I work on the evap. system.
I'll finish up emissions before my inspection that's scheduled next Wednesday.
Side shot of the new rear bumper.
I bought a push bar for Honda Pilot, in case I didn't like it, I could install it on the wife's car.
It looks weird at first, but it is starting to grow on me and totally meets the height requirements.
Photo of the first rear bumper
JSATX
Goblin Guru
Yay! Congrats on successfully dealing with the government.First off...
View attachment 1984
Now that I have plates, I can drive around town legally.
This one is only temporary, Veteran plate GOBLIN will arrive in the mail next month.
The engine cover is off again while I work on the evap. system.
I'll finish up emissions before my inspection that's scheduled next Wednesday.
Side shot of the new rear bumper.
I bought a push bar for Honda Pilot, in case I didn't like it, I could install it on the wife's car.
It looks weird at first, but it is starting to grow on me and totally meets the height requirements.
View attachment 1987
Photo of the first rear bumper
View attachment 1985