-
We've upgraded and reskinned the forum. Notice something off? Email us at [email protected] and we'll fix it.
You are using an out of date browser. It may not display this or other websites correctly.
You should upgrade or use an alternative browser.
You should upgrade or use an alternative browser.
V1 GSD AUTOS Track/Ext/Eazy-09-TC-G85
Gsd autos mn
Active Member
- Gsd autos mn Active Member
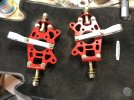
Started with knuckles and control arms polished all the aluminum with drill brush and hand scuff, did 3 stage on calipers and knuckles. Hit the control arms with my own custom blended clear . Need to paint the exhaust and body color next. Stayed tuned for my tail lights.


Gsd autos mn
Active Member
- Gsd autos mn Active Member
Did over 27 pieces yesterday


Gsd autos mn
Active Member
- Gsd autos mn Active Member
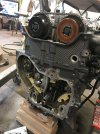
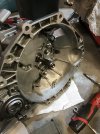
Finished up the body work, the wide fenders for the rear needed some face work but hood was pretty nice after sanding it down to 320 then 600 after finishing putty and edge work. Tackled the timing chain, water pump before I prime the body parts.


Attachments
Last edited:
Gsd autos mn
Active Member
- Gsd autos mn Active Member
Cloyes 9-4201sx chain set skp sk94201s kit. Felpro Tcs 46079 gasket set. Car came with new plugs and wires so motor is set. Going to run stock plate and clutch for now.


Last edited:
Gsd autos mn
Active Member
- Gsd autos mn Active Member
Worked on painting hood and body parts yesterday went with a black effect code X40 from Mitsubishi has a tint of red in it. Sprayed Bulldog promoter 2 coats of sealer,2 coats of base and 2 coats of clear.


Gsd autos mn
Active Member
- Gsd autos mn Active Member
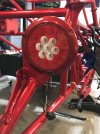
Cleaned and painted valve cover and the final few parts that needed to be painted. The tail lights are trux tled-4x40f they are identical size built in red/white led bulbs, I set them up so the reverse is just the middle section. Next I’ll start the wire harness in the garage.


Gsd autos mn
Active Member
- Gsd autos mn Active Member
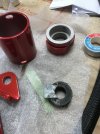
I tinted some clear again and used that on coolant tank, steering wheel and tail lights. Ordered up BC rear coils, after painting around 40 parts I’m ready to start wire harness and assembly.


Gsd autos mn
Active Member
- Gsd autos mn Active Member
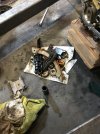
Set up work table tackled first two harness videos in few hours this morning. The rear coils are here thanks to ctunistra post on coils. The 400 pound springs are on the way. Cleaned some parts and did a final clear coat on tail lights.


Attachments
-
 0BEBBE9E-B6F3-49E6-BF2B-12AC105ED92A.jpeg450.4 KB · Views: 468
 -
 8F30D234-9937-41CB-8357-E49197037FA6.jpeg519.4 KB · Views: 430
 -
 B2F14349-7C22-403F-911C-56C6144D1605.jpeg409.7 KB · Views: 421
 -
 818E4BEF-E873-43C9-AE24-FDF8CBD9ABE3.jpeg399.7 KB · Views: 436
 -
 FD0E13D0-122C-4EF3-9D7E-937E8B43373A.jpeg386.3 KB · Views: 434
 -
 F84FDBBC-312D-4C7E-927E-D4C1BB86DA12.jpeg435.2 KB · Views: 426
 -
 A71D51DD-9D8A-42A1-BEE2-4A8E48FBA6E7.jpeg395.3 KB · Views: 429
 -
 18452AC0-A34E-4C43-B233-C76C28C43F0B.jpeg437 KB · Views: 435
Gsd autos mn
Active Member
- Gsd autos mn Active Member
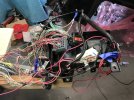
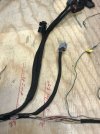
I’m on video 10 today of harness, I’m building a 2009 turbo but my model normal boost gauge due to being around the 400th cobalt vin for 2009.
Learned a lot about the vehicle doing the harness.
Some things I would recommend
-Write up notes for each video Numerical stuff is needed.
-Use zip ties and small amounts of tape at first til you need to finish I wasted some tape going back.
-Do videos in order the dash harness was more difficult even though it was smaller. I had every plug labeled but if you don’t you’ll have difficulties.
- when you cut the brake switch on dash harness make the junction at least 12" so plug can be 8" without splice present.
-ue


 zip
zip
Learned a lot about the vehicle doing the harness.
Some things I would recommend
-Write up notes for each video Numerical stuff is needed.
-Use zip ties and small amounts of tape at first til you need to finish I wasted some tape going back.
-Do videos in order the dash harness was more difficult even though it was smaller. I had every plug labeled but if you don’t you’ll have difficulties.
- when you cut the brake switch on dash harness make the junction at least 12" so plug can be 8" without splice present.
-ue
Attachments


Gsd autos mn
Active Member
- Gsd autos mn Active Member
Back to working full time I finished up 1st build video yesterday few casualties thus far.

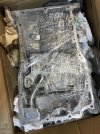
 I managed to break my brake position switch bolt off with a nut driver I should have cleaned and oiled the small bolt first. The dip stick tube snapped off while changing my oil pan that’s still not here yet from GM.I’m also looking for the water banjo fitting that I dented.
Attachments
-
 6ABCBEE4-35D8-44F0-9AA3-02A983AED363.jpeg273.6 KB · Views: 451
 -
 38C14BEA-FE84-4489-B637-73220C682532.jpeg369.1 KB · Views: 450
 -
 A0F6EF38-1362-4032-972D-8A6049891326.jpeg375.9 KB · Views: 444
 -
 B99F614C-3F5C-494A-BBFD-F19EB373E2BB.jpeg322.5 KB · Views: 446
 -
 8EEF4E11-EE82-482D-973E-8050E539F161.jpeg404.5 KB · Views: 448
Last edited:
Gsd autos mn
Active Member
- Gsd autos mn Active Member
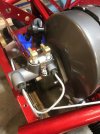
Hoses are in wasn’t that bad, I used my cart to put it in front of my pulling chain anchor and just muscled it in.


Gsd autos mn
Active Member
- Gsd autos mn Active Member
Installed clutch,wire harness,heat exchanger and NACA duct work, radiator, power cable, used a couple vise grips to loosen the fuel pump retaining rods working them loose til it popped apart. Need to get some parts in to finish steering column and complete the motor.


Attachments
-
 C0B89A6C-C7C9-4A4A-8FA3-25BD283D1B0F.jpeg258.9 KB · Views: 427
 -
 DADF0C9E-9450-482A-B0DD-699A5ABD8BA5.jpeg274.2 KB · Views: 436
 -
 2901A633-8265-489C-A092-64ACD34AFF0E.jpeg302.5 KB · Views: 464
 -
 52EDD131-4CB1-4812-A695-8896B5BFACD3.jpeg257.9 KB · Views: 443
 -
 B08D3614-65EC-4AAF-AD7D-6052F781B5D6.jpeg401.1 KB · Views: 460
 -
 BB5BD63C-9E61-4D50-A8A0-FDCEF8E19241.jpeg353.6 KB · Views: 451
 -
 EBE86489-5AAC-47B7-BDB2-5053FB676978.jpeg364.2 KB · Views: 462
 -
 96F68901-829E-4952-B2D9-E607C9BA9914.jpeg389.8 KB · Views: 440
")
Desert Sasqwatch
Bigfoot Goblin
- Desert Sasqwatch Bigfoot Goblin
Hate being on the hairy edge of breaking an expensive piece of plastic that you know you're going to mess up with one slip of a tool!  Good work!
Good work!Gsd autos mn
Active Member
- Gsd autos mn Active Member
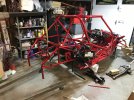
Got the Car ready to accept the motor I have a brand new LNF trap door oil pan from Canada haven’t decided if I should paint it or powder coat it for an additional $150.00. I got some eagle light 5 3/4 headlights and Tradewinds chrome buckets installed.
-310-038 trade winds bucket
-310-119 stock headlight mount
8900AH-B EAGLE LIGHTSprojection turn signal DRL head lamps
from rock auto I ordered
-EV80445 moog tie rod
FP vs50778R valve cover gasket
ME TXES80479 Tie rod end FE3
DCH 45D10711 ACDELCO Ball joint
WJB WA512285 rear wheel 5-stud hub turbo
WJB WA513206 front wheel 5-stud hub turbo
Powell race parts trap door LNF oil pan
Q1A-9HT400 Front springs from summit
BC rear coils and components
spent $20,000 so far that was going to be my budget but still haven’t got wing or tires
Attachments
-
 152F55D7-CBF5-41AF-A3F1-FE4D90AAEBCA.jpeg529.5 KB · Views: 476
 -
 FA136677-BBC4-47F0-AADF-88FB4686C5C1.jpeg432.2 KB · Views: 447
 -
 CC7E011B-8EDB-434B-93A2-8BAFDB29F1EB.jpeg383.8 KB · Views: 433
 -
 4200E28F-3E22-475B-AEAD-19DAB31B99DF.jpeg248.3 KB · Views: 443
 -
 30EB9E36-2013-4905-AB8A-D1B17553B6B3.jpeg285.2 KB · Views: 442
 -
 6262AFC7-D8F8-4F7C-88E4-79555E0EB120.jpeg325.8 KB · Views: 438
 -
 7E3B85E1-6584-45FB-8B75-0E99DF918604.png811 KB · Views: 424
Similar threads
- Replies
- 2
- Views
- 101
- Replies
- 13
- Views
- 2K