
-
We've upgraded and reskinned the forum. Notice something off? Email us at [email protected] and we'll fix it.
You are using an out of date browser. It may not display this or other websites correctly.
You should upgrade or use an alternative browser.
You should upgrade or use an alternative browser.
V1 Ark's City Goblin #187 (2008 SS/TC donor)


- Lonny Administrator
Yes, send him a reminder to [email protected]

Ark :D
Goblin Guru

- Ark :D Goblin Guru
Yes, send him a reminder to [email protected]
Got it, thank ya
Ark :D
Goblin Guru
- Ark :D Goblin Guru
Good to know. Let me know how the RMA process goes. Not a fan of shopping at sites with bad customer service.
@Anks329
So, here's how it has gone.
Mad Hornets did not respond to my first email after a full 24 hours. I wasn't too bothered by this, but I needed to be persistent in my opinion, so I called their publicized customer service number. I got a voicemail, so I left a message with the order #, and what the problem was. They sent me a text late in the day on Tuesday, asking for pictures. I took two pics and sent them in my reply, while also linking to a pic on their site that clearly shows the green wire that's supposed to be there. Nothing for another full 24 hours. Mid-day Thursday, I sent a text back to the number that had texted me, saying I just wanted to be sure my email went through, since it had some fairly big attachments. I got a response late on Thursday night, saying my pics had been "well received" and someone would reach out shortly. Friday afternoon, they reached out with their solution: they offered me a 10% credit and instructions on how to fix the wire myself with a razor blade and a soldering iron.
Just for ***** and giggles, I split open the control box to see if what they were saying was feasible. It mostly was not ... the contacts where the wires connect are all VERY small, and the entire board is coated in a rubbery substance that I assume is supposed to protect it from moisture. I got the board out anyway and decided to try my luck. I was able to solder a thin wire to the back of the board without fouling up or jumping any of the contacts ... it was sheer luck, but I am pretty proud of that!
I responded back anyway, asking for an exchange, and they haven't answered me yet. I'm not certain they are going to, but if they do, I'll let you know.
*edit* A little editorial I should add about this wing in particular ... after I got the wire soldered on, I tested it. Everything works fine now, but for some reason, the red brake light overrides every other mode when multiple wires are fed 12v. What this means is, say you're in reverse. If you're not touching the brakes, your lighting illuminates bright white for reverse, but if you touch the brake while in reverse, the lighting goes solid red. Same for both turn signals: if you're coasting to a stop with a signal on, then press the brake, the red brake light overrides the signal light. Really dumb, it basically defeats the purpose imo. I can't decide which is worse: connect every wire EXCEPT the brake wire and use it that way so the signals and reverse work right, or connect ONLY the brake wire and just do without reverse and signals.

Last edited:


Ark :D
Goblin Guru
- Ark :D Goblin Guru
Wow.
You get what you pay for.

Sorry you are having such headaches with all this, But you still have a great looking build to be proud of.
Thanks. Not trying to be whiney, just wanting Anks to know what he's getting if he chooses to buy one.
It can be fixed with a relay, some extension wires, and some diodes, but that shouldn't have to be.


Ark :D
Goblin Guru
- Ark :D Goblin Guru
Got some things checked off the list weekend. No pics because boring.
I finished my turbo IC loop. After I connected the loop, I put some coolant in and checked for dribbles up front, under the intercooler. After a minute or two, a drop came out so I emptied the loop back out, took the ports out, applied thread sealant to them, and put them back in. I let it dry overnight, and this morning, I reconnected the loop and tested. No leaks. I left it run for a good 30 minutes, no leaks, so all good.
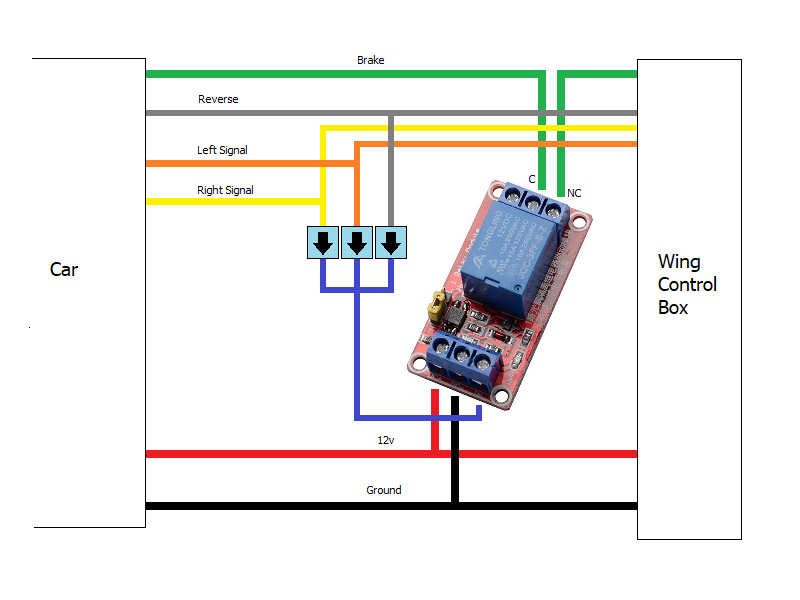
I "finished" wiring my tail lights. Finished is in quotes because I still have to figure out what I am going to do about the lighting in my wing. To reiterate, I fixed the missing wire but now the problem is, if there's power applied to the brake lead, it overrides all other light conditions which seems illogical to me. In my opinion, if you're in reverse or if your turn signal or hazards are on, those are more important than brakes. Any of you electrical gurus have any ideas on fixing this? Here's what I am thinking of doing as of now. With a simple relay and some diodes, I should be able to cut off the power on the brake lead by running it through the Normally Closed and Common connections, and by running spliced connections with diodes on them into one lead, then run that into the Input. Thoughts? Am I overthinking this like usual?
I did a preliminary cut on my engine cover with a diamond blade on my angle grinder. It went through it like a hot knife through butter.
Finally, I bundled up my wiring harness to nearly finished status. I still had to finish wrapping everything from the front bulkhead, forward. Wasn't looking forward to that, but it's done now.
Remaining tasks:
I finished my turbo IC loop. After I connected the loop, I put some coolant in and checked for dribbles up front, under the intercooler. After a minute or two, a drop came out so I emptied the loop back out, took the ports out, applied thread sealant to them, and put them back in. I let it dry overnight, and this morning, I reconnected the loop and tested. No leaks. I left it run for a good 30 minutes, no leaks, so all good.
I "finished" wiring my tail lights. Finished is in quotes because I still have to figure out what I am going to do about the lighting in my wing. To reiterate, I fixed the missing wire but now the problem is, if there's power applied to the brake lead, it overrides all other light conditions which seems illogical to me. In my opinion, if you're in reverse or if your turn signal or hazards are on, those are more important than brakes. Any of you electrical gurus have any ideas on fixing this? Here's what I am thinking of doing as of now. With a simple relay and some diodes, I should be able to cut off the power on the brake lead by running it through the Normally Closed and Common connections, and by running spliced connections with diodes on them into one lead, then run that into the Input. Thoughts? Am I overthinking this like usual?
I did a preliminary cut on my engine cover with a diamond blade on my angle grinder. It went through it like a hot knife through butter.
Finally, I bundled up my wiring harness to nearly finished status. I still had to finish wrapping everything from the front bulkhead, forward. Wasn't looking forward to that, but it's done now.
Remaining tasks:
- Finish building the rear suspension/brakes once I get the correct caliper adapters for my knuckles (woops!) and spacers for the rear wheels
- Fill the brake reservoir and bleed brakes/clutch
- Build shifter/parking brake, get tunnel mounted
- Pick out my 5-point harnesses, get them bought and installed
- Body stuff (finish cutting engine cover, prep hood/engine cover, coat them both, drill holes for the side panels, cover them, mount it all)
Last edited:

ccannx
Goblin Guru

- ccannx Goblin Guru
It looks complicated but makes sense There are also momentary relays with a timer you can set so if the delay is not great enough for the wing you can retard it a second or so. https://www.grainger.com/product/4T...id=:G:s&s_kwcid=AL!2966!3!!e!!o!1102900020094!


Torchandregdoc
Goblin Guru

- Torchandregdoc Goblin Guru
I did. I'm sure plenty of people don't, and I don't really like having the dust trap, but they are dissimilar metals.

JeffsGoblin
Goblin Guru

- JeffsGoblin Goblin Guru
Video #23 tells you to do it on the front suspension, so I did it on my rear suspension too.
Last edited: