I've never riveted before in my life. I decided to try my hand at it. I installed the gurney flap / midsection stiffener. 3/16 high strength aluminum flush mount blind rivets (not cherry max). This added a nice amount of stiffness to the spoiler midsection and they look really sharp.
Today I moved over to the exhaust. I have basically been jumping between sub-projects and working them up to the point where I've sourced all parts and resolved the design portion. Once all my planned projects are all squared away I will go back and finish everything. The exhaust is one of the last remaining projects.
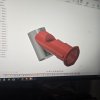
I really wanted to run a solenoid operated exhaust cutout. I ordered one, but the cutout pipe is not at a suitable angle. I decided I will just cut into the Goblin factory pipe and weld the Y pipe for the cutout into the down tube right after the factory cast manifold. I 3D printed a 55 degree angle jig and bought some steel exhaust tubing to test my cutting jigs, which worked well, as well as gave me some time to get my welder dialed in. After a little brainstorming, I redesigned a 3D printed clampable mockup jig with adjustable length and the collector in order to fully mockup the exhaust cutout and check fit. With this new 45 degree angle jig, I can clamp it in place and ensure everything fits perfectly before marking the cut.
The exhaust cutout will be able to be opened and closed from a button on the steering wheel. I want to see if I can find a nice quiet muffler that will fit in place of the DF supplied one.
I spent about 3 hours on the Summit website last weekend trying to pick the right parts for the new exhaust system. All my exhaust parts came in. I've never done exhaust work in my life so I thought this would be a fun project. I decided on a 3" to 2 1/2" reducer pipe into a Dynomax turbo as 95Blitz recommended for a more silent option. Spent last night dialing both of my MIG welders in to get some decent welds on the exhaust. I cut the downpipe, ground the old support welds and got the old DF exhaust free. I cut the Y junction from my 3D printed template and got everything clamped and tacked for the cutoff. Got a loose fit on everything else. It all fits perfectly. I will get the rest of the exhaust tacked up tomorrow and fabricate some support mounts for the muffler. I like how the exhaust cutout is totally hidden out of view under the muffler, which was exactly what I was going for. I'm super stoked because I had so much fun with this and it all went together so nicely.
Exhaust is fully welded up. Today I made a muffler support bracket that mounts off of the upper flange of the exhaust bracket and bolts to each side of the muffler supports, using some flat steel and some 1" hot roll angle I had laying around. Its pretty solid now. The washer stacks on the brackets will be replaced with rubber bushings. I still need to paint the pipes.
Front wing is finalized and now has proper support. I redesigned a modified turnbuckle for the front wing support rods I bought. Their engineer said my design wont work but he's wrong. I designed a bracket that goes between the upper shock mount bolt and headlght bolt. It holds a threaded rod that holds the turnbuckle. I still need to drill the wing and rivet everything. The front wing will be solid and fully adjustable.
Headlights were relocated and now bolt to the bracket I designed. I designed some 3D printed magnetic covers to improve theappearance.
Today I am working on the grille. I am working through a few iterations of trim rings by CAD designing and 3D printing, until I get it to fit just right.
Once I get the trim ring perfect, I will design an actual grille. I want to utilize the design to maximize airflow to the radiator.
I also did some design work on a ram air intake for the air to water radiator.
Still working the CAD for the front grille, but settled on this design for now. I removed the lip trim ring because I think it looks much cleaner without it. I ultimately ended up having to laser scan the lip of the cowling because none of the CAD angles were quite right in my original 3D model. All of the shapes and angles all had to be re-drawn from the scan and then lofted together. It takes a fair amount of tweaking the scale of fit ring and re-printing it to get the size perfect with no gaps. I am hopefully on my last sizing iteration of the fit ring, then I will print the full assembly in black ASA. With the base trim ring fitted and complete I can design any style grille I want from it in the future.
Well, been a longer break from the build than planned, but had to leave town for a course for work, came home and got sick for 2 weeks. I planned to retire next year, but work offered me a big promotion and a pay raise running the safety program, so I guess I will stick around another 4 years. In the meantime doing that job now and my old job too and trying to train a few other guys to take over my old job while battling newly diagnosed sleep apnea.
In the meantime I have been reorganizing the garage. Got AC installed finally so I can now work during the summer. Got my other project car up and going again and will either sell it or start driving it to work. Waiting until I have an actual 2 day weekend so I can print out my prototype side ram air intake scoop.
Took the day off yesterday to complete the ram air cooling duct prototype. 29 hour print. Part way in, I noticed that the slicer failed to generate proper supports. Looking over the model, I estimated tthat the base geometry would still print just fine, which it did. Pulled off the finished print and checked fit... I was nervous about fit because my laser scan data was purely reference point-based and I had all the frame tube geometry mostly drawn in by software. The fit ended up being perfect...
I will print the mounts next, install it, and scrutinize the duct to determine if the final print will require any additional processing or minor cosmetic upgrades.
This site uses cookies to help personalise content, tailor your experience and to keep you logged in if you register.
By continuing to use this site, you are consenting to our use of cookies.