• We've upgraded and reskinned the forum. Notice something off? Email us at [email protected] and we'll fix it.

V1 Devo's Extended Track #381 - 06 SS/SC Donor

D
First start today was a success! Engine sounds good but idle sort of pulses. Shut things down to correct coolant leaks on the supercharger heat exchanger and then will try to read codes and troubleshoot.

The gauge cluster showed “power steering”. I realized I didn’t have the blue plug in the picture connected but don’t see a missing mate. Where should that be in the harness?
 

Attachments

  • BF4C3FD0-EE63-449A-ADEB-E7C265F9BD20.jpeg
    BF4C3FD0-EE63-449A-ADEB-E7C265F9BD20.jpeg
    407.4 KB · Views: 348
D
I got the button panel installed and coolant leak taken care of. I thought I had the wiring right, but the horn is stuck on. Can anyone confirm the plugs and wire colors against the pictures? Separate issue is that the engine keeps running for a few seconds after the ignition is turned off. I remembered reading that others had the same problem but couldn’t find it searching through posts. Any recommendations on where to look?
 

Attachments

  • 987F6F9B-94CC-4990-9B25-359331A00B2F.jpeg
    987F6F9B-94CC-4990-9B25-359331A00B2F.jpeg
    434.9 KB · Views: 361
  • 01F7FC4E-460C-4620-8FDB-2DAB1F294053.jpeg
    01F7FC4E-460C-4620-8FDB-2DAB1F294053.jpeg
    287.2 KB · Views: 357
Robinjo
I got the button panel installed and coolant leak taken care of. I thought I had the wiring right, but the horn is stuck on. Can anyone confirm the plugs and wire colors against the pictures? Separate issue is that the engine keeps running for a few seconds after the ignition is turned off. I remembered reading that others had the same problem but couldn’t find it searching through posts. Any recommendations on where to look?
For the engine run on, I put a diode in the line for the Heat Exchanger Fan. It stopped it from running about 2-5 seconds after shutdown. If you PM me your address, I can send you one as I bought 10.
I used this, but my INFO button doesn't work. Everything else does as does the button, which lead me to believe mine is wiring issue on my part and not the kit. But, take that for what it is.....
2022-08-15 Wiring Sheet.JPG
 
Last edited:
D
For the engine run on, I put a diode in the line for the Heat Exchanger Fan. It stopped it from running about 2-5 seconds after shutdown. If you PM me your address, I can send you one as I bought 10.
I used this, but my return button doesn't work. Everything else does, which lead me to believe mine is wiring issue on my part and not the kit. But, take that for what it is.....
View attachment 36738
Thank you. For the life of me, I couldn't find the applicable threads. I searched for diode and now see what is needed, I may even have one lying around. I'll dig back into the button panel this weekend.
 
D
Life has been too busy. Making progress again. Found a short in my horn circuit. Installed a diode into the heat exchanger power wire, which corrected the continued running issue.

Front suspension is assembled and looking good. Still need to get the subframe in and rear suspension put together. Targeting getting it ready for a first test drive around the new year. Time will tell. :cool:
 
D
Took the week off and working towards mechanical completion. Couple questions came up:
1. Do the original tie rods from the steering rack get swapped with O32I?
2. I didn’t opt for the rear coilovers. Can someone confirm that they look correct? The cups seat nicely and the top nut appears to have full engagement, but the spring isn’t centered very well.
 

Attachments

  • 6C0F529D-4A31-4F17-8594-9605096B1D5D.jpeg
    6C0F529D-4A31-4F17-8594-9605096B1D5D.jpeg
    227.8 KB · Views: 342
  • D8B72C2A-9B0E-45D8-83F5-3C0D77C831E5.jpeg
    D8B72C2A-9B0E-45D8-83F5-3C0D77C831E5.jpeg
    384.4 KB · Views: 348
  • 175D994B-86CA-4741-AD47-30814CE95142.jpeg
    175D994B-86CA-4741-AD47-30814CE95142.jpeg
    314.3 KB · Views: 352
  • EA429CD3-D389-4F45-94C5-95F8B02AB737.jpeg
    EA429CD3-D389-4F45-94C5-95F8B02AB737.jpeg
    293 KB · Views: 334
Desert Sasqwatch
The 'original' tie rods and rod ends go on the back of the car - they follow the front suspension onto the rear of the Goblin - and the new tie rods and rod ends from DF go onto the new front suspension. Not certain about the springs, someone else will have to comment who has used the stock springs.
 
Ross
The stock springs look wonky, but that is the way they are on a Cobalt.
If it bothers you, you can convert it over to new 2.5"ID springs and a:
QA1 COK104 - QA1 Coilover Hardware Kit.

If you want to save some bucks, I could sell you my used QA1 springs and coilover kit, as I have upgraded to the DF rear struts.
You can get an idea of what they look like in these early pics of my build.
 
D
Thanks all. I’ll get the old front tie rods moved to the rear and new kit onto the front. I’m not a fan on the fit of the cut springs but will see how it looks once on the ground. Wheels and tires will be ordered shortly.
 
Rttoys
The aftermarket rear struts will give you a lot of adjustability to dial in the suspension.

As I always recommend, get stickiest tires you can. You have a supercharged model, it doesn’t take much to overpower normal tires.
 
Rttoys
I can asure you it is very easy to turn the tires over and I’m in 200 treadwear Conti Extremes.
Then go softer. :D The Toyo R888R’s I’m using are 100tw and really don’t spin at all. I also don’t try to spin them, but at autocross we launch very hard and I don’t spin. Now, I only get about 1500-2000 miles on tires, but those are very fun miles.
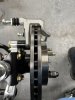
 :cool:
 
D
Working on brakes but getting contact on the outside edge of the caliper to the rotor. Do they need to be shimmed normally, or do I have something assembled incorrectly?
 

Attachments

  • 0265E9B6-9265-453B-A6A7-BF9813FA0592.jpeg
    0265E9B6-9265-453B-A6A7-BF9813FA0592.jpeg
    201.3 KB · Views: 341
  • 27F2C90C-E139-4963-984F-C79852AD41E3.jpeg
    27F2C90C-E139-4963-984F-C79852AD41E3.jpeg
    273.1 KB · Views: 328
  • 3FB6A12A-9260-44BA-8B1D-9DF2853B5BEB.jpeg
    3FB6A12A-9260-44BA-8B1D-9DF2853B5BEB.jpeg
    266.7 KB · Views: 355
Desert Sasqwatch
Dumb question from me - can you put more than one lug nut on to make certain the brake rotor 'hat' if full flush/seated against the bearing hub face? Hard to see from the photos, looks like only one lug nut is holding the rotor in place.
 
D
Dumb question from me - can you put more than one lug nut on to make certain the brake rotor 'hat' if full flush/seated against the bearing hub face? Hard to see from the photos, looks like only one lug nut is holding the rotor in place.
Apologies on my own dumb question. I pulled everything apart and reseated a few times. Fresh paint appeared to be binding on the inner rotor wall. In now rotates true. Thanks for the sanity check and back to it. Getting close to the finish line. :)
 
Back
Top