
• We've upgraded and reskinned the forum. Notice something off? Email us at [email protected] and we'll fix it.

V1 Riley's Full Cage Goblin -07 SS/TC F23 #457

newbtrying
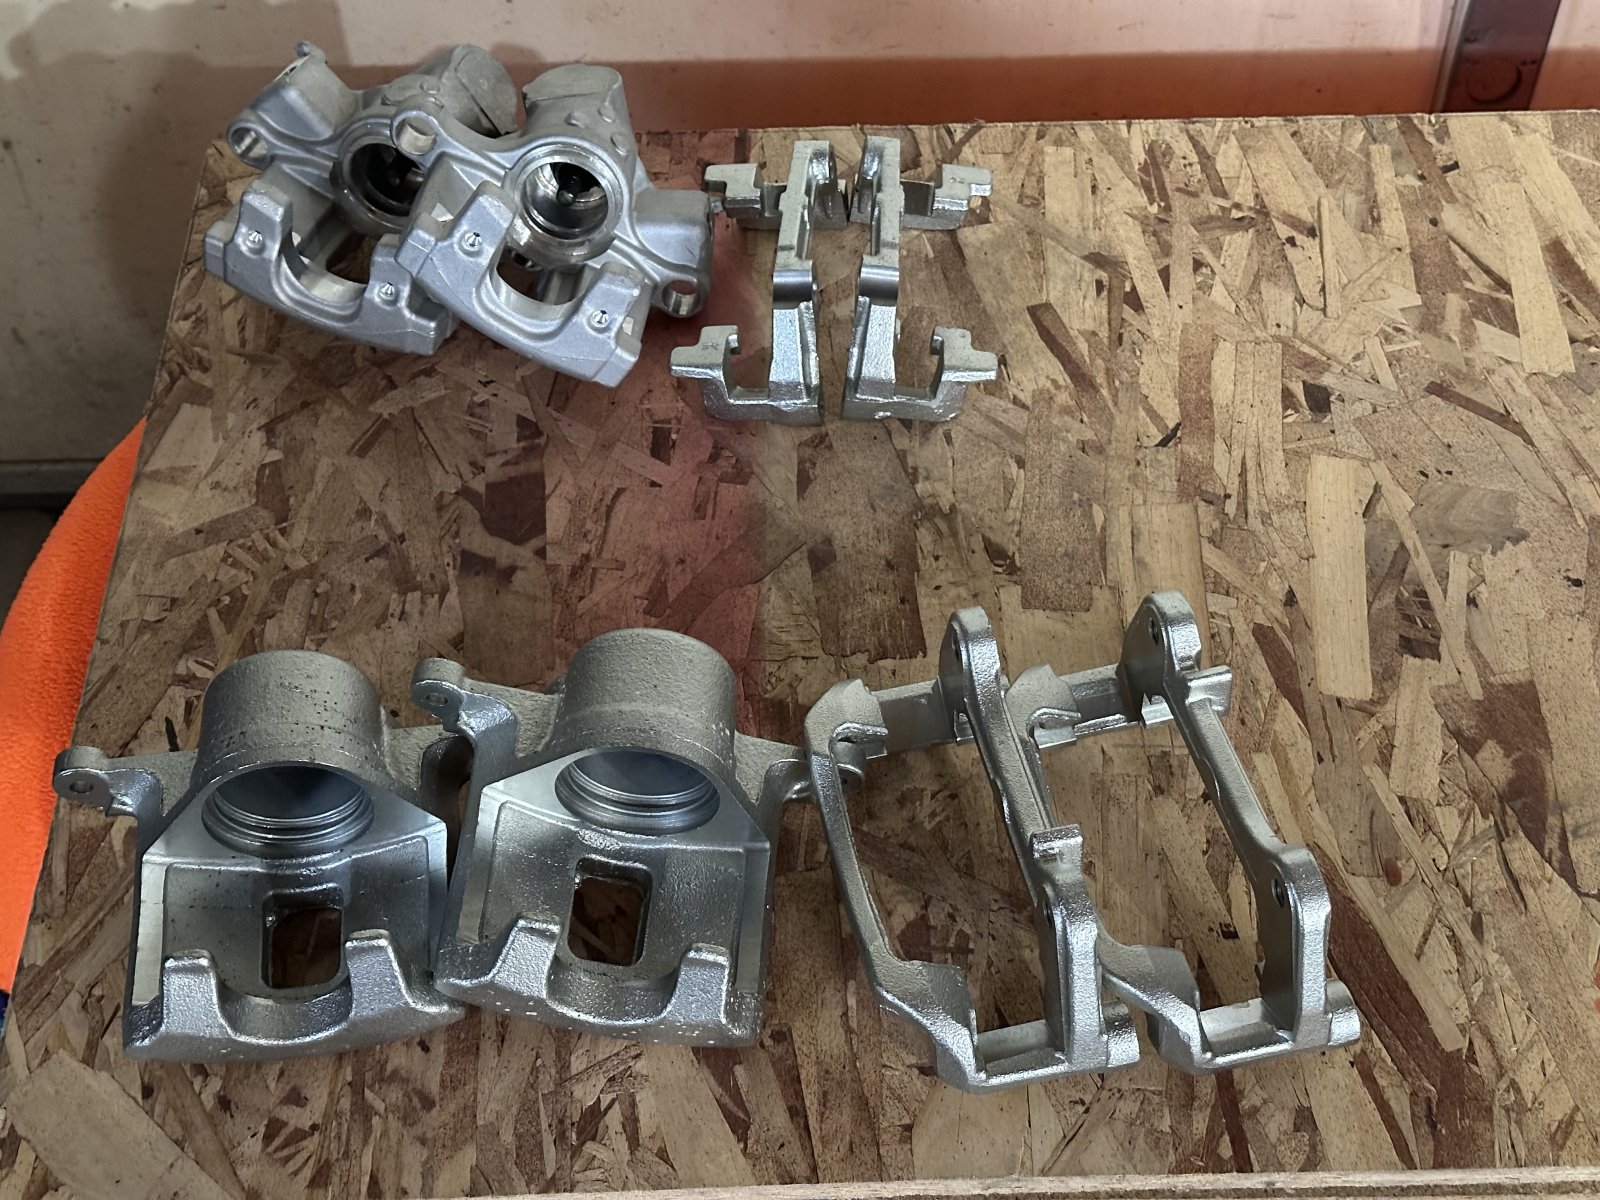
Yesterday I tackled the powder coating of the calipers. I did both front and rears that I bought new from DF with the kit.

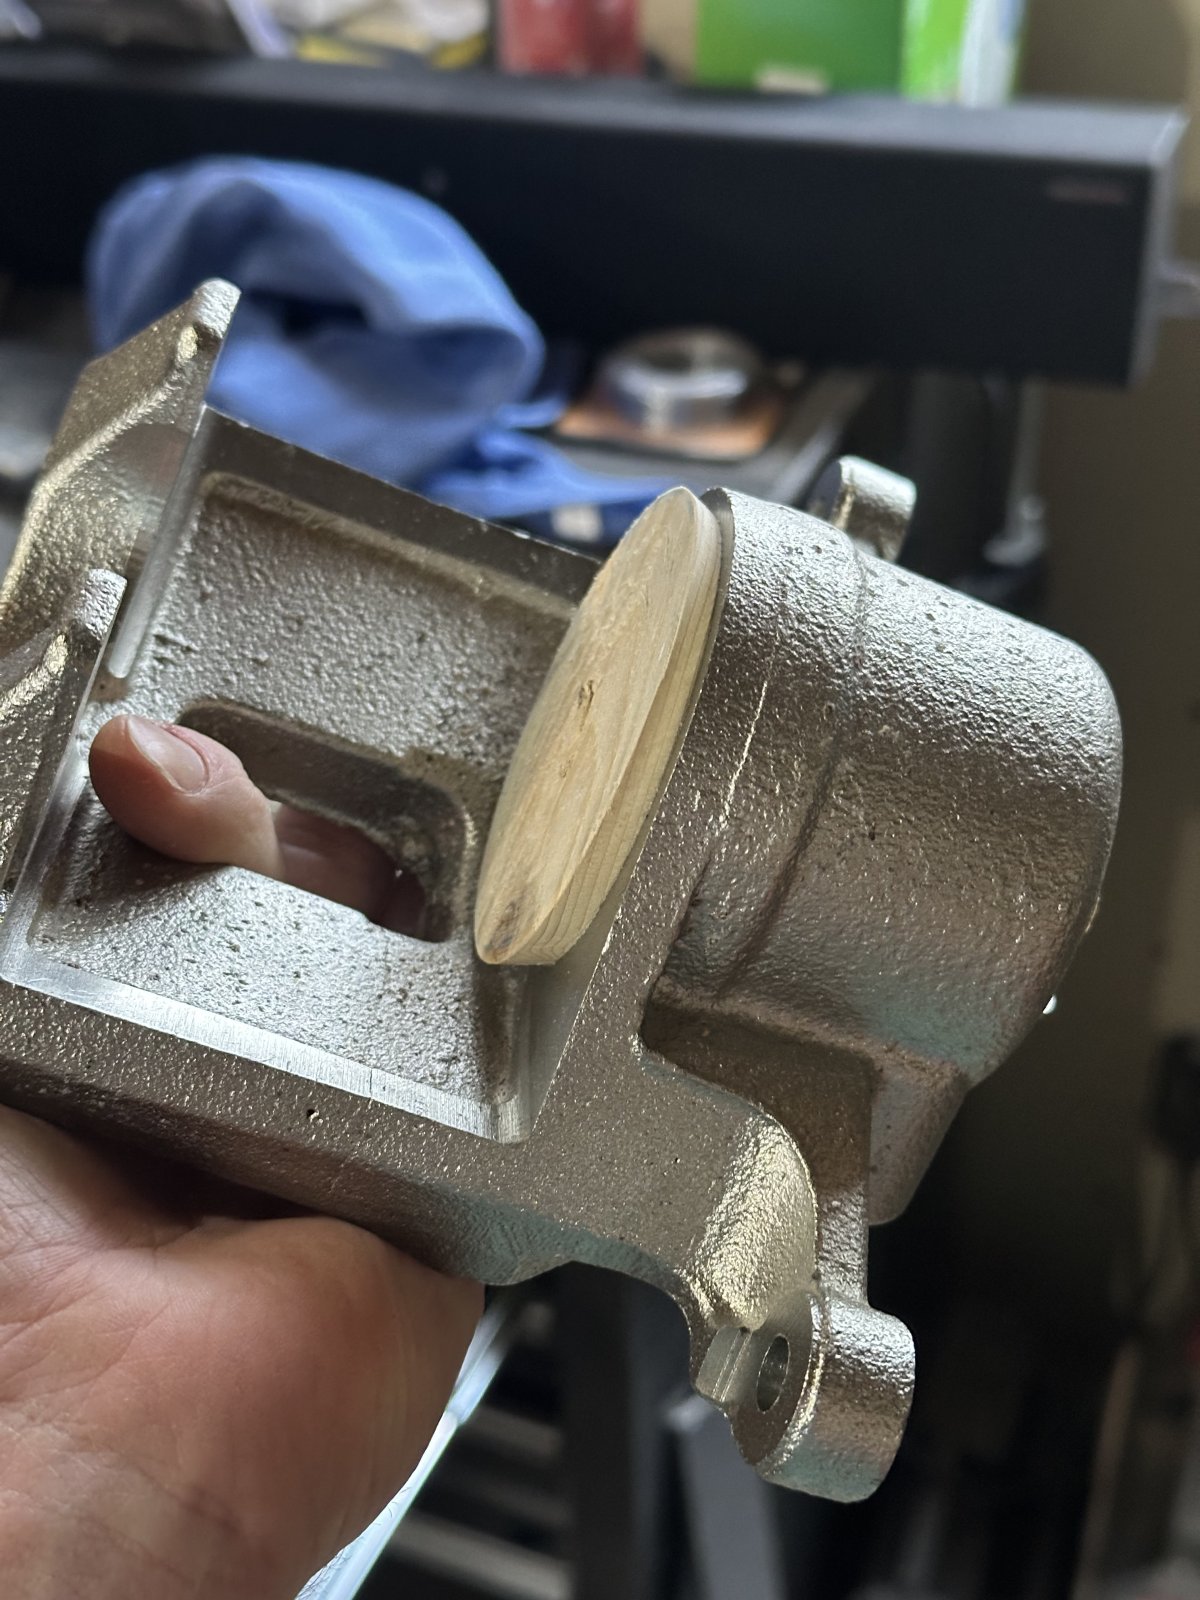
First step was to disassemble them. The only thing I didn’t remove from the calipers before sandblasting, degreasing and coating was the parking brake lever on the rear brakes. Otherwise, I taped off everything I didn’t want powder coat on and used silicone plugs for bolt holes. I also spun up some wooden plugs to keep everything out of the piston recess for the fronts. I used a long wood screw that came in from the brake line hole to hold it in tight.
55264


55265


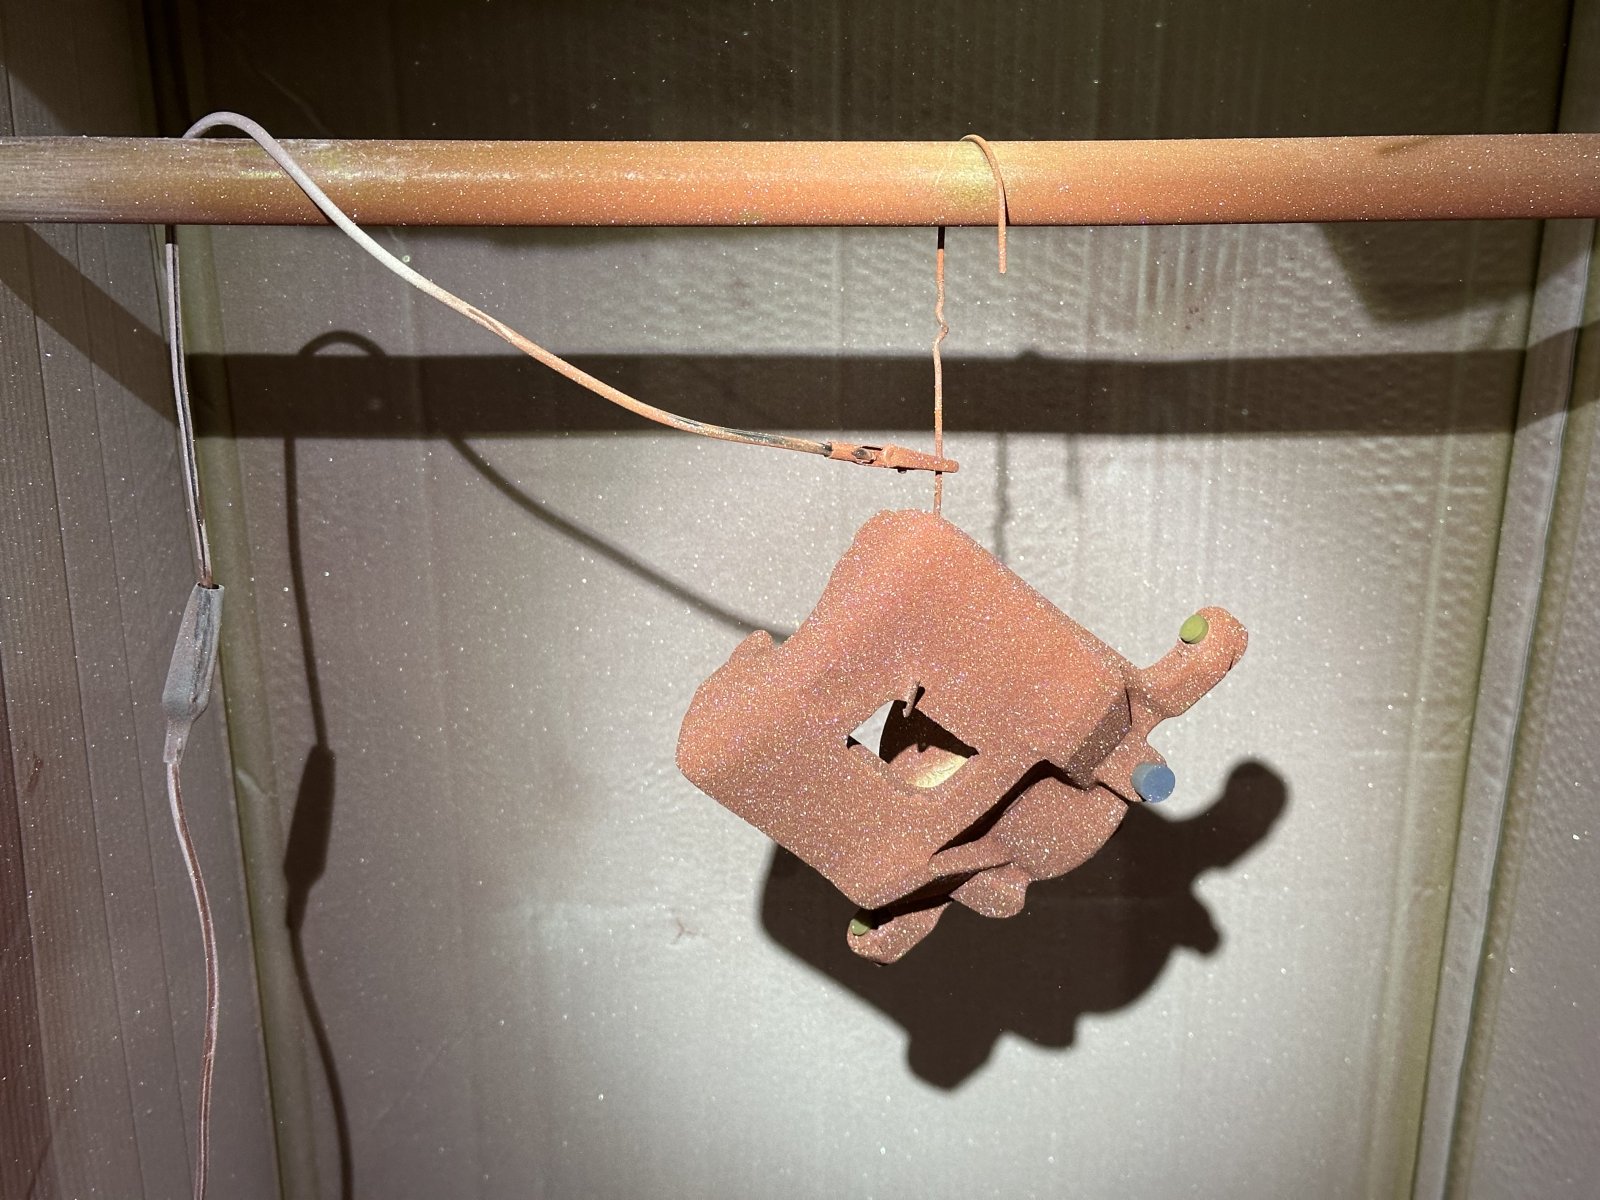
The actual coating of the calipers was… much harder than the parts I did the day before. The small nooks and crannies didn’t want to hold powder no matter what my Kv was set at. I think a more expensive gun would have made this easier, but I made it work regardless. With the parts coated in the base color, I flash cured them.
55266


During this step I already knew the clear coat was going to apply like a fever dream and unfortunately, I was right. I sprayed the parts with clear coat cold and basically nothing stuck. I ran each part to the oven and baked at 375 to the point where what did stick started to gel, pulled them out, hooked the ground up, and sprayed a generous amount of clear coat powder on them hot. The powder basically melted on contact, which made coverage easy and effective. This was by far the most stressful and annoying part of this process. It took much longer too.
55267

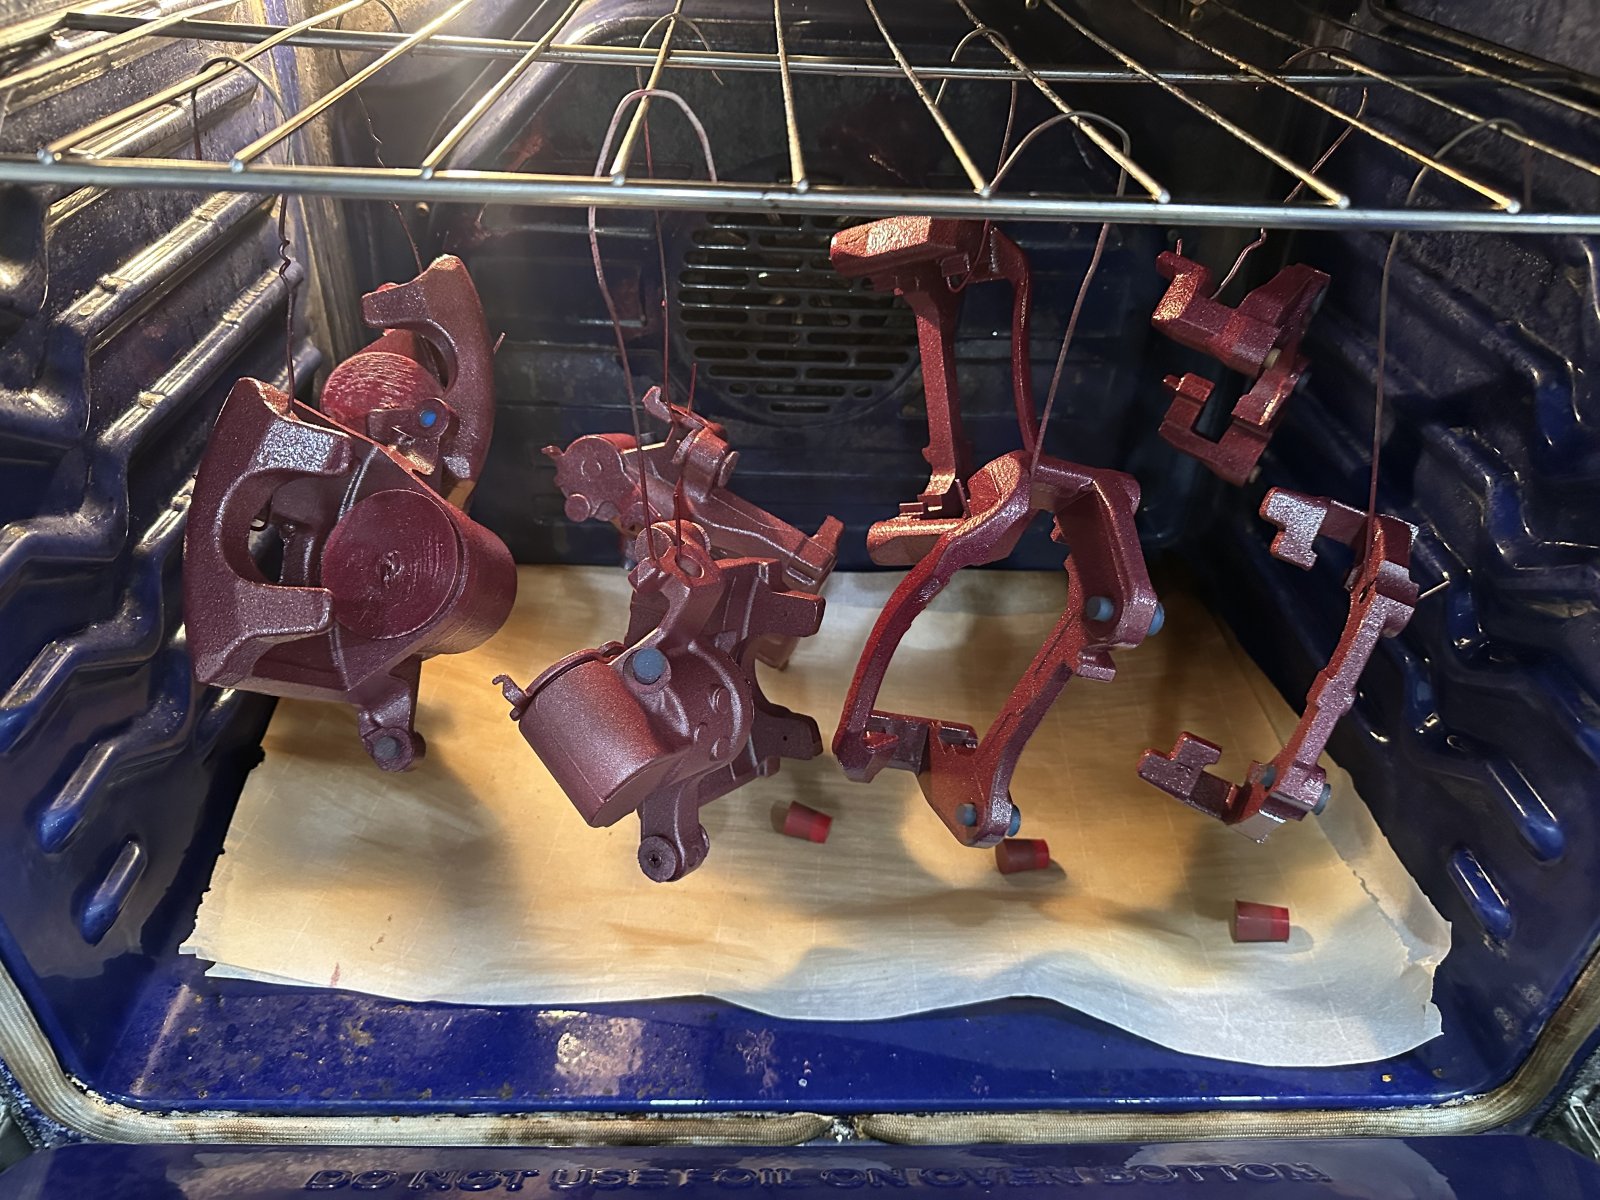
the hot flocking of the calipers was time sensitive business and stressful, so I didn’t take any pictures until I had them in the oven to fully cure. Here they are at the beginning of thst

Eventually I had every part clear coated and then final cured them at 375 for 20 minutes. Once they cooled, I pulled all the tape and plugs off and reassembled them. Thankfully this step was pretty easy and I didn’t hit any hiccups.
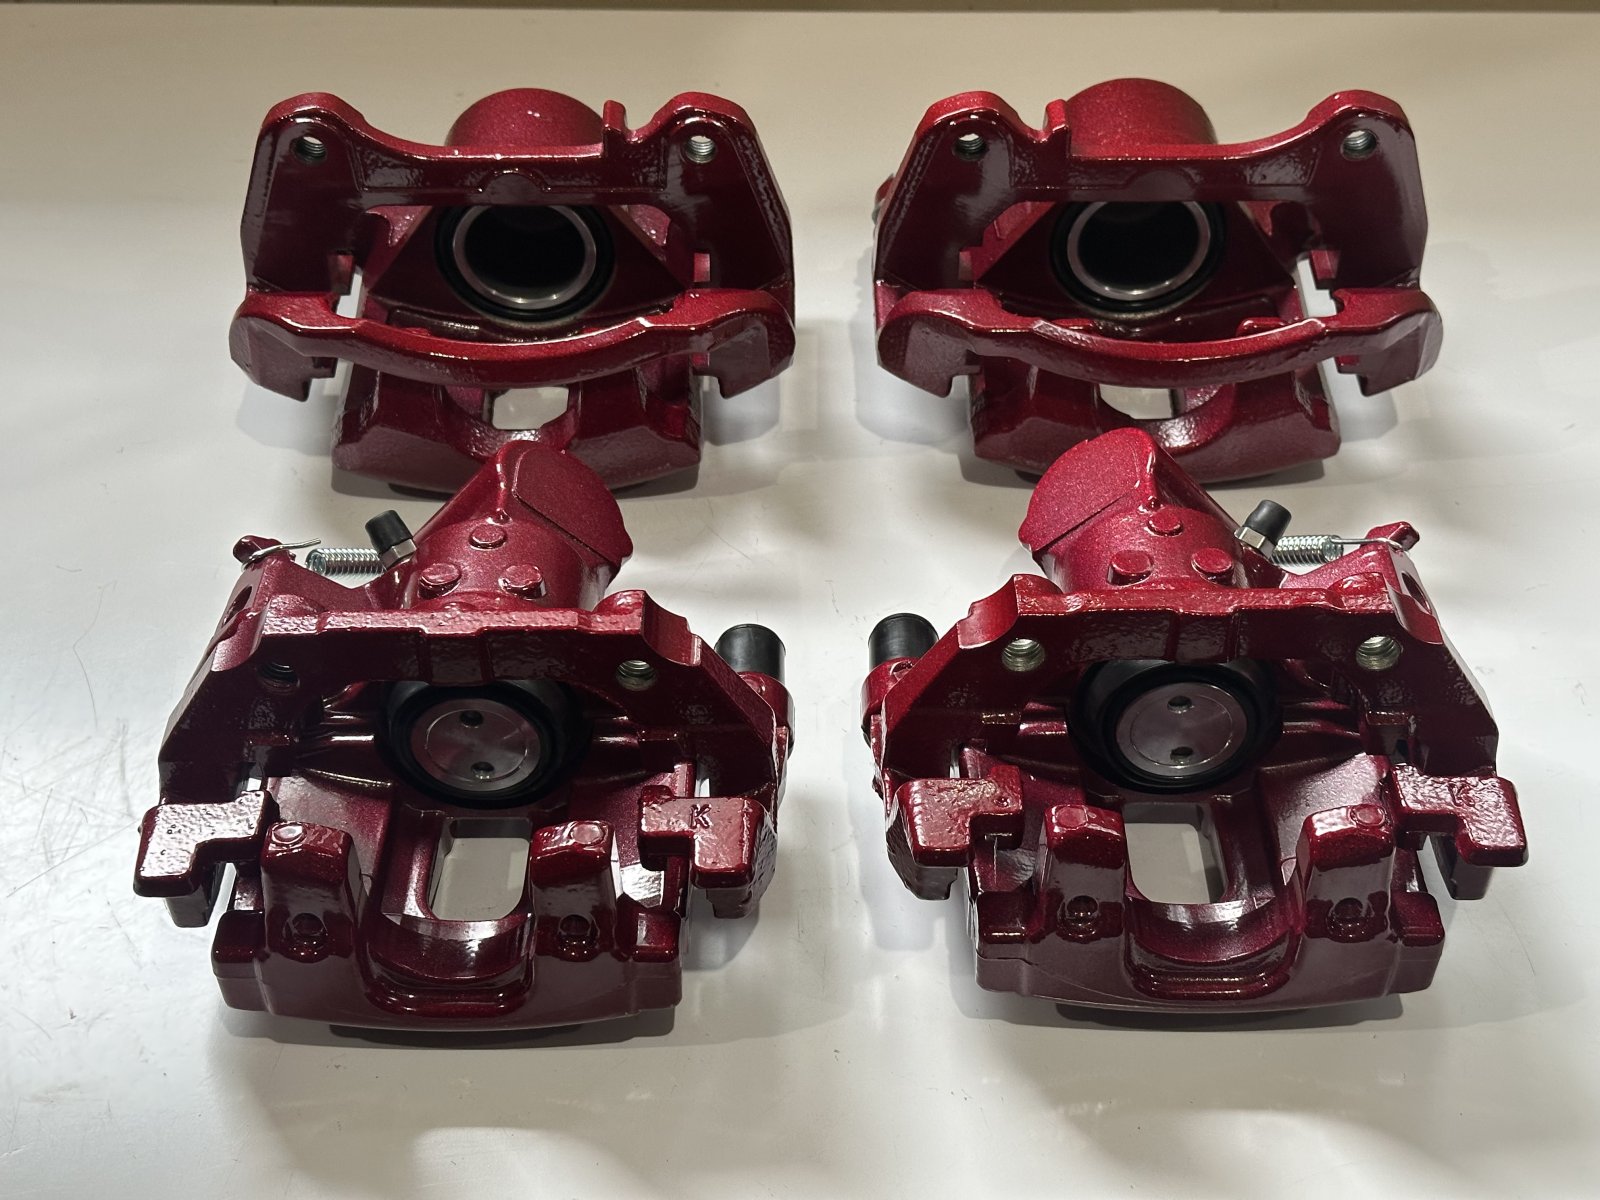
55268


Overall, I would do this again. But if a friend asked me to do it as a favor they’re out of luck. It wasn’t that level of easy lol
 
David
Yesterday I tackled the powder coating of the calipers. I did both front and rears that I bought new from DF with the kit.

First step was to disassemble them. The only thing I didn’t remove from the calipers before sandblasting, degreasing and coating was the parking brake lever on the rear brakes. Otherwise, I taped off everything I didn’t want powder coat on and used silicone plugs for bolt holes. I also spun up some wooden plugs to keep everything out of the piston recess for the fronts. I used a long wood screw that came in from the brake line hole to hold it in tight.

View attachment 55264

View attachment 55265

The actual coating of the calipers was… much harder than the parts I did the day before. The small nooks and crannies didn’t want to hold powder no matter what my Kv was set at. I think a more expensive gun would have made this easier, but I made it work regardless. With the parts coated in the base color, I flash cured them.

View attachment 55266

During this step I already knew the clear coat was going to apply like a fever dream and unfortunately, I was right. I sprayed the parts with clear coat cold and basically nothing stuck. I ran each part to the oven and baked at 375 to the point where what did stick started to gel, pulled them out, hooked the ground up, and sprayed a generous amount of clear coat powder on them hot. The powder basically melted on contact, which made coverage easy and effective. This was by far the most stressful and annoying part of this process. It took much longer too.

View attachment 55267
the hot flocking of the calipers was time sensitive business and stressful, so I didn’t take any pictures until I had them in the oven to fully cure. Here they are at the beginning of thst

Eventually I had every part clear coated and then final cured them at 375 for 20 minutes. Once they cooled, I pulled all the tape and plugs off and reassembled them. Thankfully this step was pretty easy and I didn’t hit any hiccups.

View attachment 55268

Overall, I would do this again. But if a friend asked me to do it as a favor they’re out of luck. It wasn’t that level of easy lol
Looks like they came out great.
 
newbtrying
Little update from a few days work:

I spent my free time getting the front suspension squared away. No hiccups and the new videos on DF Kit Car YouTube channel made it very very easy. I did have to run to the store to get some m10 nuts for the wheel hubs, but no big deal.

55316

55317


Once the upper and lower control arms, coilovers, uprights, steering arms, wheel hubs, rotors, and calipers were on, I had to skip the brake lines for a moment and throw on the wheels to see how it’d look. DID NOT DISAPPOINT. I’m so happy with the look!

55319

55320

55321


I’ll be gone for a week on a work trip, but I’ll get back to work on the car when I get home. While I’m gone, I’ll be waiting for a Cobalt front knuckle set that I need to order. I managed to throw my donor’s out somewhere between the first state I started this project, and where I live now. I think I’ll also buy some black lug nuts to match the wheels.

Should I go splined, or some other option?
 

Attachments

  • IMG_6848.jpeg
    IMG_6848.jpeg
    348.1 KB · Views: 80
newbtrying
Somewhere I made a mistake. I am trying to get the rear suspension mounted up and when I got to the wheel bearing, my axle (2000 Grand Am axles [30 spline]) does not have the same spline diameter/count as my wheel hub (new from DF Kit Car, non-turbocharged 5x114.3 option [33 spline]).

I posted for help to the f35 to f23 swap post I used as a guide for my own swap, so I’ll link that here. If you know, plz drop some knowledge. Otherwise I’ll have to bother Adam with another email, and wait for his response.
55380
 
Last edited:
Rauq
I posted in your other thread as well but now that I see your info here, let me try it this way:

Assuming you have an F23 trans, redrilled non-LNF hubs (non-turbo), non-turbo knuckles, and brakes to fit the knuckle, I think all you're missing are base model manual trans half shafts. The Grand Am half shafts are only for an F23 with LNF hubs (which only fit LNF knuckles).
 
David
Hey man, just saw your post on the transmission swap thread and saw something with your turbo setup. Not sure your aware that the oil drain should not be below the oil level. Only way I found out is because someone pointed it out on a thread. My Z57 is the same way and will be moving it to the proper location.

I also didn't know my line was getting burned and cracked.
Screenshot_20260126_214733_Chrome.jpg
20260120_190013.jpg
 
newbtrying
Hey man, just saw your post on the transmission swap thread and saw something with your turbo setup. Not sure your aware that the oil drain should not be below the oil level. Only way I found out is because someone pointed it out on a thread. My Z57 is the same way and will be moving it to the proper location.

I also didn't know my line was getting burned and cracked. View attachment 55471View attachment 55472

Thanks for the heads up, I'll keep an eye out for issues. I'm not convinced that the drainage location matters. As long as the turbo is above the oil level in the oil pan, it's going to drain just fine. Whether it drains to a galley plug or the bottom of the pan shouldn't change how the oil drains from the turbo itself. Maybe if the drain line was restrictive, but it's not. What kind of issues were you having that made you change the drain location on yours?
 
David
Thanks for the heads up, I'll keep an eye out for issues. I'm not convinced that the drainage location matters. As long as the turbo is above the oil level in the oil pan, it's going to drain just fine. Whether it drains to a galley plug or the bottom of the pan shouldn't change how the oil drains from the turbo itself. Maybe if the drain line was restrictive, but it's not. What kind of issues were you having that made you change the drain location on yours?

Thats what I thought but couple of commented and did a quick search and sounds correct.

The drain back must dump into the oil sump above the level of oil. Its a non-pressurized return so oil will backup into the return line if mounted into the oil level in the sump. I noticed a little oil backing up but wasn't sure what it could be. I haven't drilled and tap yet but will be switching it to be safe. Also the LNF drains into the galley so should be better.
 
newbtrying
Update time:

I ordered a pair of the 4340 2005-2010 Cobalt 2.2/2.4 axles. This seems to be the solution to my issue and the piece of the puzzle that I was missing. I'll confirm this to be true when I receive and install them.

In the meantime, I have some odds and ends to work on. I started checking them off in no particular order of importance.

First, I rerouted my turbo piping. I loosened the V band on the turbo and rotated the compressor housing toward the engine. This allowed me to squeeze the silicone boot on underneath the cage of the Goblin. I think this routing is better in every way, and looks better, but it is definitely a tight squeeze under the cage and between the engine. Although, not tight enough that the boot is deformed.

55476


I Also used my free time to mount the quick release steering wheel and associated parts, including the blinker lever. That process was straightforward and uneventful. While i was working in this area, I installed the button panels, but did not hook up the wiring to them yet. I'll do that on a day I have more patience and garage sodas.

55477

55478

55479

Finally, I relocated the brake fluid reservoir and hooked it up to the master cylinder. The clutch line is not finished because I have to pick up a constant tension clamp to attach the 3/8" hardline on both ends.

55480


To do next (also in no particular order):
1) finish installing rear axles and suspension.
2) get brake lines hooked up and bled
3) bleed clutch
4) wire button panel
5) trim shift selector counter weight so it doesn't interfere with the Goblin cage
6) hook up air/water heat exchanger for intercooler
7) connect shift linkage bracket and shift linkages to transmission.
8) install tunnel cap
9) install seats
10) alignment
11) install headlights/brakelights/license plate mount
12) register & license
13) perfect engine tune


There's still a lot more to do, but I also feel like there's almost nothing left to do. Certainly a weird feeling. Winter has still not hit in full force in Montana for some reason, so I'm thinking it'll be a late spring. This timeline is one I can work with to get the Goblin on the road in the early parts of fair weather spring.
 
Rauq
I highly highly recommend a pressure bleeder for the brakes and clutch if you don't have a plan there already. Makes everything but the last part of the clutch bleed a one-person job. I can bleed all my brakes by myself just as fast as I can hook up a catch line at each caliper with it set up.
 
newbtrying
I highly highly recommend a pressure bleeder for the brakes and clutch if you don't have a plan there already. Makes everything but the last part of the clutch bleed a one-person job. I can bleed all my brakes by myself just as fast as I can hook up a catch line at each caliper with it set up.
I love that idea. I was brainstorming on this last night because I heard the clutch can be especially tricky. My whole profession is specialized in fluid dynamics, so I had a good idea that pressure would be a better way than vacuum to get this thing air free.
I was thinking I’d just put my air compressor regulator on 5-10 lbs and put a wood (that I can easily make with a lathe) plug in place of the reservoir cap, and have the air hose screwed into the top of that plug.

if that doesn’t work, I’ll buy a cheap pressure breeding kit.
 
newbtrying
The Motive style pressure bleeders are the way to go. That way you are adding fluid from a pressurized reservoir and the odds of pushing air into the system goes way down.
ok, you guys have convinced me. i'll leave the redneck engineering to another project. I ordered a pressure bleeder kit that will be here tomorrow.
 
Rauq
I love that idea. I was brainstorming on this last night because I heard the clutch can be especially tricky. My whole profession is specialized in fluid dynamics, so I had a good idea that pressure would be a better way than vacuum to get this thing air free.
Trickiness in the clutch comes from the slave cylinder being after the bleeder. There's no getting away from pedal bleeding the slave, so once you've pushed fluid out of the bleed screw at the trans from the pressure bleeder up front, you have to do the ole pedal down - bleeder open - bleeder closed - pedal up routine. Pressure bleeder does help you make sure you're pulling in air in any part of the process, though.
 
Robinjo
Trickiness in the clutch comes from the slave cylinder being after the bleeder. There's no getting away from pedal bleeding the slave, so once you've pushed fluid out of the bleed screw at the trans from the pressure bleeder up front, you have to do the ole pedal down - bleeder open - bleeder closed - pedal up routine. Pressure bleeder does help you make sure you're pulling in air in any part of the process, though.

I do this pedal down/up method for the slave cylinder while still under pressure from the Motiv unit. Just being clear on this item.....
 
Rauq
Yes, although you don't need the full pressure in the pressure bleeder at that point. All it's doing is making sure your fluid level doesn't drop in the reservoir. It'll still push a little fluid out from the line that goes to the back of the car to the bleed screw, but that's fairly inconsequential.
 
G
I didn't have to do anything additional to bleed my clutch with the motive other than maybe let it sit under pressure to allow the air to get to the high point, which is the bleed point.
 
newbtrying
Brake lines installed on the front. Seemed like they were *almost* too short. The DF Kit car video said to keep the line pointing vertically at the banjo bolt, but with the steering wheel cranked all the way out, it was just too tight to make the line fit properly, so I angled them toward the control arm which gave me enough room.

55489


Also trimmed the counterweight on the trans. This was easy and required less trimming than I imagined it would.
55488
 
Back
Top